Thursday, February 28, 2019

Clock Face Square

Welcome back to Lost Coast Portal to Creativity where Lost Coast Designs and Carmen's Veranda collide to bring you twice the inspiration and double the fun!

Hello Portal Peeps!  Gail here today wih the last of the month!!   Doesn't February always seem to whiz by??  I'm here with the final inspiration post for our current challenge Hip to be Square.  The team have been using the lovely Carmen's Veranda Squares stamps the last two weeks.  If you haven't checked out their projects then please do scroll down and have a little lookie.  Today I've gone a bit arty and used Clock Face Square in a graphic style.
I kept to black and white with a hint of gold mirror card.
I started by stamping the Clock Face Square with black archival on white card and cutting around the edge.  I am also using a square white base card.
I placed my image on the card and drew some wiggly lines with a pencil.  
I ripped a piece of scrap paper and using Black Soot distress ink and a blending tool I made halfish of the white base black.  This took quite a bit of blending to get a good depth of colour.  Probably use a Promarker next time LOL.  
I cut a mm off the black edges of the Clock Face Square and mounted on a white card square to give me the white edging effect.  I stamped and black embossed the image on two gold mirror card sheets.  One is quite a yellow gold and the other one is a paler shade, I call that one white gold LOL.  I cut out the embossed bits of the clock and layered then on the image.  
I hope you have enjoyed my project today.  There is still time to join the Hip to be Square challenge with your stamped square makes, or stamped makes featuring square elements.  The linky closes at 5 minutes to midnight tonight!!  Join the fun for a chance to win Lost Coast dollars!
https://lostcoastportaltocreativity.blogspot.com/2019/02/challenge-70-hip-to-be-square.html

Tuesday, February 26, 2019

Hip to Be Square Challenge: Ancient Architecture Tiles

Welcome back to Lost Coast Portal to Creativity where Lost Coast Designs and Carmen's Veranda collide to bring you twice the inspiration and double the fun!

Oh how I love these square stamps from Carmen's Veranda!  This is Laurie again with another project for the "Hip to Be Square" Challenge, this time using the Architecture Square and the Corinthian Square stamps.  There are 35 different square stamp designs to chose from and they are all fab!!

I started by stamping my squares with black Stayzon Ink onto coordinating background papers made with my Gelli plate, some impression plates, and acrylic paints.  I cut each square and layered it onto black card stock, then onto white card stock.  Next I embossed a really cool border die and used copper metallic paper.  I then cut sections as shown and mounted those to each corner with foam tape.  I was going for the look of old tiles framed for hanging.

So get out your square stamps or make a project that features something square and enter the current challenge for a chance to win some free stamps!  We would love to see the Carmen's Veranda square stamps, which we are featuring with this challenge, but any square stamps you have will do!


Sunday, February 24, 2019

Butterfly Squared, Hip 2 Be Square Challenge #70

Welcome back to Lost Coast Portal to Creativity where Lost Coast Designs and Carmen's Veranda collide to bring you twice the inspiration and double the fun!

Hello all,

Lori here, with a new project for the Hip 2 Be Squared challenge.  I really squared things up with this card!   A square card base with a double mounted Butterfly Square stamp!  Whew!


Lost Coast Designs and Carmen's Veranda stamps used:

Instructions:


Hope you will join us for this challenge!  I would love to see your creations!  Just click on the link below to add your project to the challenge blog.


Happy day,
Lori

Saturday, February 23, 2019

Instagram Promotion Winner

Welcome back to Lost Coast Portal to Creativity where Lost Coast Designs and Carmen's Veranda collide to bring you twice the inspiration and double the fun!

Hello Portal Peeps.  Just popping by to announce the winner of our instagram promotion.

We would like to thank everyone who joined the fun and followed us on Instagram and tagged a friend.

The lucky winner is

Congratulations Angela.  You have won $10 to spend at Lost Coast Designs and/or Carmen's Veranda!

Please email Gail (craftynomad at gmail dot com) by the 5th March to claim your prize.  Please provide your full name and mailing address in the email as well as the stamps you would like.  You may choose from Lost Coast Designs and/or Carmen's Veranda!

Stay tuned for more fun and games and inspiration from the team.

Our current challenge is

HIP TO BE SQUARE

https://lostcoastportaltocreativity.blogspot.com/2019/02/challenge-70-hip-to-be-square.html

Link up your stamped Square makes, or stamped makes featuring square elements
 for your chance to win some Lost Coast Dollars.

Friday, February 22, 2019

Bunny Square

Welcome back to Lost Coast Portal to Creativity where Lost Coast Designs and Carmen's Veranda collide to bring you twice the inspiration and double the fun!

Roni here with another fun square creation for
Challenge #70 - Hip to be Square!


I went with the bunny square...I figured spring is right around the corner so why not be a bit optimistic and start hopping....I mean hoping for it a bit early.

This card was created by stamping the yellow mat using the Sketchy Lily using VersaMark ink.  The bunny was stamped on white card and colored using Memento Dual Tip markers then cut out, mounted on a golden mat and affixed to the yellow panel.  I then stamped the sentiment, added a couple pearls and then popped it onto a green card base!

Now it's your turn...to be square!


Wednesday, February 20, 2019

Greek Woman Square

Welcome back to Lost Coast Portal to Creativity where Lost Coast Designs and Carmen's Veranda collide to bring you twice the inspiration and double the fun!

Hi and welcome to a fun tutorial using
'Greek Woman Square'
from Carmen's Veranda stamps.


This is such a beautiful stamp to play with.  It kept catching my eye, so how could I resist it?

Here is a step x step on how she comes to life.

1:   Stamp the Greek Woman Square stamp onto some white card stock.  I used a stamping platform so that the lines are nice and crisp.  Then stamp it again onto some scrap card.

2:   Mask the arch, leaves and woman with masking fluid. Allow to dry. 

3:   Cut out some extra leaves from the extra stamping that you made earlier and put aside. It isn't too fussy.

4:   Scrap some Gathered Twigs and Bundled Sage DI onto your craft sheet and spritz with a little water.  Swipe your card diagonally through the inks, following the line of colours so that they kind of stay separated.  Dry.  Dab a few more times to pick up some extra colour and interest.  Dry.

Note: To help with swiping diagonally, I like to hold the card by the top right and bottom left corners, this does the thinking for you and you don't need to think about the diagonal action.  Try it!  It works!

5:   With a damp cloth, or paper towel, wipe any excess ink off your masked areas.  Then gently peel away the  mask. 

6:   The geometric arch and berries are coloured with Jane Davenport markers, and the goddess is coloured with watered down DI's.

7:   To finish off - Go around the edge and add some stenciling with Bundled Sage, glue on the extra leaves and mount onto your card.


I always think it is fun when you can take a bit from a stamp and add it to the original stamp. 
It goes together beautifully.


A reminder that we have a Square challenge here and on face book in our group.
(you can enter here or on face book, it's up to you).
I hope you are inspired with all the examples
and decide to join in the fun.
There are great prizes too!


Happy Stamping!
Dot x

Monday, February 18, 2019

Square Challenge

Welcome back to Lost Coast Portal to Creativity where Lost Coast Designs and Carmen's Veranda collide to bring you twice the inspiration and double the fun!

Cathy here with 2 cards for this challenge.

Stamps Used: Forest God square
                     Calligraphy square
       MRaven2

 For this card I started out with some mixed media paper and Distress Oxide inks. I picked some greens and a brown to go with the Forest God stamp. I smooched the inks on my craft mat and dipped my paper in it. I did this till I got the look I wanted.

 I then stamped the Forest God square on it with black ink.  Mind you I didn't stamp it strait or in the center where I wanted so I had to make it work with some cutting and adding some bling.  I then layered it with some brown cardstock and added it to a green card.

For this card I stared out the same way. Mixed media cardstock and some Distress Oxide inks. This time I used purple and blue for the colors.  I smooched the colors on my craft mat and dipped my paper in it. I then stamped Calligraphy square on the paper. I did not want full coverage of the stamp so I did not ink it fully. I cut it down to size.
 Next I took one of the new raven stamps MRaven2 and stamped it over the top of the Calligraphy square. I then added a light touch of glitter to the raven. Layered it on blue cardstock and then on a pattern paper on a white card base.

You can find all the square stamps here. There are quite a few of them .

Ok I showed you mine you can show me yours. Come join the challenge here.

Saturday, February 16, 2019

Eye Chart

Welcome back to Lost Coast Portal to Creativity where Lost Coast Designs and Carmen's Veranda collide to bring you twice the inspiration and double the fun!

Time for your eye exam....
Good Morning Friends - Ink Stained Roni here...


Our current challenge is #70 - It's Hip to be Square!
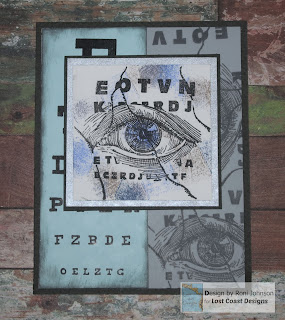
This is a really cool challenge as Carmen's Veranda has an entire page full of stamp Squares.  My favorite has got to be the "Eye Chart". Such a fun and funky image.

I started off by stamping it on a piece of white cardstock that I then inked with a stipple brush here and there with a few colors of blue and grey inks.  It was trimmed and matted then set aside. I then began to work on the background.  I started off with a grey cardstock panel that I again stamped the Eye Chart image many times with grey ink.  I also stamped the actual eye chart onto a piece of blue cardstock, trimmed and mounted on the grey panel.

I attached the square to the blue/grey panel and mounted it all on a black card base.

Stamps: 
Eye Chart Square


Be sure to enter your "Square".

Good Luck Everyone!

Friday, February 15, 2019

CHALLENGE #70 - HIP TO BE SQUARE

Welcome back to Lost Coast Portal to Creativity where Lost Coast Designs and Carmen's Veranda collide to bring you twice the inspiration and double the fun!

Greetings.  It's time for our new Challenge.
Our challenges are now fortnightly!  A new challenge starting the 1st and the 15th of every month, with chances to win your self some Lost Coast dollars. We will be announcing winners on the 5th of the month, so do pop back and see who wowed the team and gets our snazzy blog badge and the coveted Lost Coast dollars.

Now for our new Challenge!

CHALLENGE #70

HIP TO BE SQUARE


This fortnight the team are going to be showcasing Carmen's Veranda's Squares.
These are a series of nearly 40 stamps which have an arty, distressed look.  Most are 2.75", but a few are 4".  They make a wonderful focal image for your projects, as I am sure the team will show us.   If you have any of these stamps we would love to see them, but of course, if you don't, we will accept square projects, and square elements in your projects.  Just please remember that real stamping needs to be obvious.  Digi creations will be deleted without notice. 

Please remember we do have some Challenge Rules to follow so look them over to ensure your entries qualify to win this month's prize!

You are welcome to play in our Challenges using rubber stamp images from any company but if you use any of our Lost Coast Designs or Carmen's Veranda stamps...we love it when you do...then your entry counts as two which doubles your chances of winning in our random prize drawing.

PRIZES

To ensure you all have a fabulous time playing in our Challenges this is how our Prize system works!
The more entries the better the Prize so tell all your friends to join the fun too!

1 - 4 Entries = one winner chosen by the team is awarded our Challenge Winner's Badge
5+ Entries = one randomly picked winner will receive a $5 gift certificate to spend at
Lost Coast Designs/Carmen's Veranda
10+ Entries = one randomly picked winner will receive a $10 gift certificate to spend at
Lost Coast Designs/Carmen's Veranda
and all winners get our snazzy Challenge Winner's Badge to proudly display on their blogs!

If you don't have a blog then no prob, you can still play in our challenges by sharing your projects from public photo sharing sites which includes our Facebook Company Pages for Lost Coast Designs and Carmen's Veranda.  Please include our Challenge info and the link back to our challenge in your photo's description!  As long as the privacy setting for your photo is public you're good to go.  You can also link up your project in our fb fan group if you use Lost Coast Designs and/or Carmen's Veranda stamps.  See, it's so easy to join the fun!  FYI, you can't link up projects shared in closed Facebook groups! 

Here's some inspiration from the team to get us started.  ENJOY!

Gail made this gorgeous faux stained glass effect card using Jester Square and Carmen's Veranda Eat A Cookie sentiment.

Laurie made this beautiful card using Butterfly Square
 

Lori also used Butterfly Square to make this really cool coaster


Now it's your turn.  Are you up for the challenge?  We can't wait to see your projects!  
Submit your entries in the linky party below by 5 to midnight PST on the 28th and don't forget to follow us so you don't miss anything!  The team will be posting more inspiration throughout the month so check back and join the fun.

Happy Stamping!
Gail
Challenge Host


Thursday, February 14, 2019

Simple and Sweet Watercolor; Love & Hearts Challenge #69

Welcome back to Lost Coast Portal to Creativity where Lost Coast Designs and Carmen's Veranda collide to bring you twice the inspiration and double the fun!

Hello all,

Lori here, sharing with you a card featuring Rosie, Hard Luck Pixie.  How cute is she?!?!  She is so cute that I thought it would be best highlight her beauty with a simple water color.


Lost Coast Designs:
Instructions:


Hope you will join us for this challenge!  I would love to see your creations!  Just click on the link below to add your project to the challenge blog.


Happy day,
Lori


Tuesday, February 12, 2019

Love, Hearts and a Bouquet of Flowers

Welcome back to Lost Coast Portal to Creativity where Lost Coast Designs and Carmen's Veranda collide to bring you twice the inspiration and double the fun!


Hi, it's Dot here today with a tutorial for you
using hearts and a couple of fantastic stamps.

It's the season for love at the moment and this little chap
Rose Boy
kept catching my eye.

This is the finished card.  I really wanted the boy with the bouquet
to be front and center on this card.
Here are some of the steps for how he got to this stage.


Step 1:  I've covered an A6 sized bit of card with distress inks (broken china and picked raspberry).


Step 2:  It's probably a little difficult to see but I've used a heart stencil on the background.  I've spritzed it with a little water and placed it onto the distress ink background. I like to dab it with some paper towel while it is still sitting on the card so that the 'bleaching of colour' is crisper.  Then dry.


Step 3:  For this bit I've stamped Rose Boy with Distress Oxides (Vintage Photo for a nostalgic feel) using my Misti.  I'm about to go over him with some more colours so a stamping platform of some sort is handy.


Step 4:  The second colour I've used on the boy is Walnut Stains.  But only in some areas, like his had and lower area.  And then again in Ground Espresso.


Step 5:  And to finish of the colours on him I've used Black Soot sparingly.  The face and bouquet of flowers I've left in the original Vintage Photo colours.


Step 6:  Sorry ... I've run out of pics!  But you can get the gist of it from a close-up of the finished piece.  I decided that the background needed some more hearts so I've applied some picked raspberry distress ink directly to the stencil and spritzed it with a little water and 'stamped' it onto random areas around the boy. Again, using paper towel to dab gently to prevent any over-flow of wetness. Also, I've torn the card down each side of the image.

Step 7:  There was plenty of left over background.  This came in handy to die-cut some hearts. I like to edge them with a little colour so that they stand out a little more.


Step 8:  When I was putting all the elements together I decided that there was just a little too much white space for my liking.  So, using the same technique of using a couple of colours of Distress Oxides and a Misti, I added some more heart details with the Hearts and Curls Border.


To finish off it was a simple case of layering everything to my liking. Oh, and I've water coloured some ground for him to stand on with a water colour pencil.

I hope that you've enjoyed the tutorial and decide to give it a go.
Let us know if you do!

Happy Stamping!
Dot x