Showing posts with label Grunge Tree Background. Show all posts

Sunday, April 20, 2025

Where´s my hat: Moon Dolls

Welcome back to Lost Coast Portal to Creativity where Lost Coast Designs and Carmen's Veranda collide to bring you twice the inspiration and double the fun!

Hi everyone! Today I made a big card for our Where's my hat Challenge with two ,persons' with hats! :-)
I stamped them, and the hat, onto a seperate piece of white cardstock and cut them out. I coloured them with Ecoline Markers and glued them onto an inked and stamped (tree) background.


There are so many ,hat-possibilities'! Hope you give it a try and participate! Looking forward to see what you create! See you next time. 
Happy Easter! 


LiesbethXX

Saturday, December 28, 2024

#192 Cold and Frosty, winter scenery.

Welcome back to Lost Coast Portal to Creativity where Lost Coast Designs and Carmen's Veranda collide to bring you twice the inspiration and double the fun!

 
Hi, Riet here.
Well, another year has almost passed.
This is also my last time this year that I blog.
But I hope to see you again in the new year.

For today,
  My DT contribution for the "Cold and Frosty" challenge of  Lost Coast Designs.
Still time to join till the end of the month.

Now how to make this quick and easy card.
Supplies,
Die of a deer.
Distress ink, Iced Spruce.
Any black inkpad.
White gell pen.
White acrylic paint.
Black marker.

Start with a piece of torn printing paper.
Lay it over your paper and use a finger sponge.
Use Iced Spruce to make edges along the paper.
If you apply a little more pressure in a few places you can make tufts of grass.

Now we are going to use Distress ink Iced Spruce
 and the brayer to create the sky.
Go slowly, taking ink multiple times is better than too much at once.
Stop when you are satisfied with the result.

Now we are going to stamp the tree with black ink.
There are several ways to use your stamps.
In this case, the Grunge Tree stamp has a border.
I cut the tree out. This way you have 3 stamps.
You can use it completely, or just the tree, or just the border.
I stamped the tree twice.
Once straight as a tree and once diagonally against it as a thick branch.

Just look at the white circle.
We fill in the space to connect the branch with the tree with a black marker.
And that's how you make the tree as big as you want.

Using the white gell pen we make snow on the tree and branches.
And with the acrylic paint we splatter snowflakes.

Now I have to admit that I made a mistake.
I glued the die cut of the deer after splattering with the white paint.
 I should have done that earlier so that the deer also has snowflakes on its back and body.
But the choice is up to the maker what you like better.
I also extended the tree trunk with a black marker.

Glue your card onto black and white cardstock,
 and you have a beautiful yet easy to make winter scene.

I wish everyone a happy new years eve, and see you in 2025.

If you have a winter card, come and join the challenge.
Maybe you'll be our next winner.
No LCD stamps required to join.

Monday, December 18, 2023

#180 In the deep mid winter challenge.

Welcome back to Lost Coast Portal to Creativity where Lost Coast Designs and Carmen's Veranda collide to bring you twice the inspiration and double the fun!

Hi there, Riet here.
 Its a lovely challenge, love the winter theme.
I hope you will join the lost coast designs challenge.
You have a chance to win stamps.
And let's face it, who wouldn't want that.
Now the step by step of this winter landscape.


What I used for this card.
(used only the tree)

 Stazon 
Midnight Blue.
Jet Black
Saddle brown

Distressink,
Dusty concord
Musterd seed
Chipped sapphire
Stormy sky
Tumbled glass 
Distress oxide,
Weathered wood

White gelpen.
Markers or color pencils.

I started with 3 strips of paper that were torn off.
Sponge along the paper edges with the Distress Oxide Wethered wood.
This way you can make beautiful snow edges.

I also use these strips as masks when I stamp the cityscape.
I stamped it with stazon midnight blue.

Now choose a place where the moon should be and
use Distress ink Musterd seed to make a yellow spot slightly larger than the moon stamp.
Stamp the moon with the Stazon Saddle brown.

Now we are going to create the sky with ink blenders.
For this we take different colors and build up, from light to dark, as shown on the card.
I used these distress ink colors for this
Dusty concord, Chipped sapphire, Stormy sky, Tumbled glass.

Well, because I only thought about using the Lycaonia stamp at this point, I stamped her on a thin paper, colored her in and glued her on later.
But before I glued her on I first stamped her on the card so I knew exactly where to place her.

Stamped the trees with Stazon black.
Now finish with the white gel pen. Make stars in the sky and snow on the tree branches.

I hope you enjoyed it and join us in the challenge. The more who participate, the greater the prize.
And you can even participate with stamps from another brand.


Friday, October 20, 2023

31 days of Halloween- day 20 Cats

Welcome back to Lost Coast Portal to Creativity where Lost Coast Designs and Carmen's Veranda collide to bring you twice the inspiration and double the fun!

 Hello everyone, Riet here.
Are you in the Halloween mood yet?
Well I do, and I love it!!!!
The Lost Coast Designs Halloween challenge actually consists of 2 parts.
The first part is a general Halloween challenge.
The second part is a Halloween cats challenge.
So I picked up my favorite cat and made a card with it.
The "Devil in disguise".

What I used:

Distressink Walnut stain
White gelly pen
Masking tape
Red Posca marker
Versfine onyx black
Derwent inktense pencils,
But you can use other pencils or markers.

How to make the card.
I stamped the cat with the Versafine,
Masked the cat and stamp the window with Versafine black.
Stamped the window on a piece of paper 
and cut out the 4 windows.
With the mask still on the cat, place the paper frame on the card as a mask.
Stamp the grunge tree in the window.
Now remove the masks.
Use a 2cm/0.8inch circle punch to punch a circle of masking tape.
Stick it on the window, this will become the moon.
Now we are going to color the sky and the moon.
I used Derwent inktense for this.
The cat wings and hoorns are colored with a red Posca marker.
The points of the staff are also colored with the red posca marker.
The background is also colored with a Derwent pencil.
With an ink blending tool I applied some Distressink Walnut stain to the edges.
Stamped the words on a peace of paper and blended some walnutstone on the edges.
Glued it on with foam tape.
Now you are done.

Hope you will join the challenge, and maybe you wil be our next winner
of new rubberstamps.
Click the link for the challenge and join.


Saturday, October 14, 2023

31 Days of Halloween Day 14. Halloween explosion box.

Welcome back to Lost Coast Portal to Creativity where Lost Coast Designs and Carmen's Veranda collide to bring you twice the inspiration and double the fun!

Hi there, Riet here.
I made a Halloween explosion box. 
I love the halloween stamps from lost coast Designs.


Stamps I used:
Lost coast Design
Carmens Veranda

Other stuf for this explosion box.
We R Makers explosion board
12x12 200 grams paper
61/2 x 61/2 200 grams paper
halloween stencil
Bleach
posca markers
white gellpen
Dylusions paint
Lemon zest
Tangerine dream
Dylusions sprays
crushed grape
polished jade
cut grass
tangerine dream
versafine onyx black
distressink black soot

I made the box using the We R Memory makers explosionbox board.
I took the XXL size for that.
Take sturdy paper, I used 200 grams.

 With the Dylusion paint Lemon zest and a 
ink blending tool or a sponge you can now make the paper completely yellow.

Using a baby wipe and the dylusion paint tangerine dream, 
lightly wipe over the yellow.

Now we will stamp the box with Versafine onyx blacke.
You can do this with any black waterproof ink.
Now pay close attention! A mistake was easily made.
Place the box unfolded in front of you,
be careful not to stamp the image upside down.
Start with the top center square and stamp your image.
Now turn your box a quarter turn to the right and stamp the next center square.
You do this a total of 4 times.

The lid is also stamped this way.
Because I found the color of the box a bit boring, 
I decided to spray some of the dylusions ink sprays on it.
I sprayed a little too much for my liking, so take it easy with the sprays.

I stamped the inside of the box with the spider web background stamp.
Always make sure your ink is completely dry before turning the paper over.
Otherwise you will get smudges.

Now we are going to bleach certain parts in the stamps.
I prefer to work with a cheap synthetic brush.
Your brushes are suffering quite a bit from the bleach.

Once everything is dry, we continue with applying some colors with the posca markers.
A few accents here and there is enough.
You can also add some accents with the white gel pen.

Now we are going to fill in next to and around the 4 sides with stamps.
This we keep in black ink.

With a Halloween stencil and Black Soot distress ink, 
I added some decorations to the inside of the box.

With an ink blending tool and Black Soot distress ink, 
I added some shadow to the edges of the box.

A witches hat and some other little Halloween stuf in the middle.
With flying bats on a strip of mica.

And that's it, you can decide for yourself the decoration in the box. 
You probably have something in your stash that you can use.
I hope you enjoyed it, and if you have any questions please let me know.
Well for the challenge, the team would love it if you would participate.
And that is even allowed with stamps from other brands.
It's so much fun and you can win a prize too.
So click on the link and join in.


Monday, September 18, 2023

#175 Its all about "Birds" this challenge.

Welcome back to Lost Coast Portal to Creativity where Lost Coast Designs and Carmen's Veranda collide to bring you twice the inspiration and double the fun!

Hi there, Riet here.
 What a nice challenge this is.
Who doesn't love birds.
For this challenge I used the stamps:
This is a stampsheet with individual words and I must say, I use them a lot.

What else did I use:
Stazon midnight blue.
Distress ink,
Evergreen bough,
Peacock feathers,
Twisted citron,
Mowed lawn.
Versamark.
Gold embossing powder.
Blonde moments EP Savory Sky Iridescent,
White gel pen.
Blue and green colored pencils or markers, whatever you prefer.

How I made it.
I started with the 4 distress colors on the craft sheet and a little bit of water.
I ran the paper through that and made ink spots.
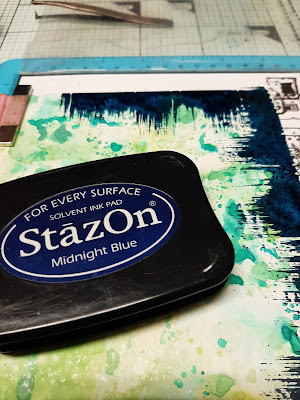
I stamped the edges with a stamp from the brushstrokes sheet,
 and Stazon midnight blue.

I forgot to photograph the next step.
But that is not difficult to do.
Take a thin paper and stamp the Gothic window
 with the stazon midnight blue and color it with the pencils or markers.
Stamp the window on the background as well.
Cut out the colored window and glue it to the stamped print on the card.
Give the window some accents with the white gellpen. 
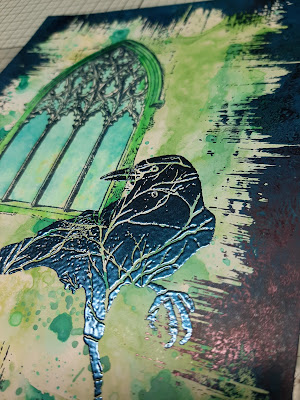
Stamp the Raven with the Versamark and 
sprinkle the dark blue embossing powder on top.
 
Use a heattool to melt the embossingpowder,
And now you see the beautifull dark blue shine.
Just look how beautiful this dark blue color is.

Now we move on to the grunge tree.
The grunge tree has a frame and I didn't want to stamp it.
So I covered it with tape.
The stamp was inked with Versamark.
Remove the tape before making the print.
Sprinkle with gold embossing powder and use the heat tool to melt it.
I did the edge of the card with my finger. 
Press your finger on the versamark and swipe along the edges.
Sprinkle with gold embossing powder and use the heat tool to melt it.
With the stazon midnight blue the word "Fly" is stamped here and there.
In the window I gave the glass some shade with a dark blue pencil.
And some white accentswith the gellpen on the stone frame of the window.

Hope you liked this tutorial.
And dont forget to join the challenge.
Thanks for visiting the blog.