Showing posts with label snowflake. Show all posts

Sunday, December 12, 2021

Watching snowflakes

Welcome back to Lost Coast Portal to Creativity where Lost Coast Designs and Carmen's Veranda collide to bring you twice the inspiration and double the fun!

Hello, all Cathy here with a snowflake gnome card for you.
Stamp used: Profile gnome

I started out with some purple cardstock, and I used a snowflake stencil with some white stencil paste. I have never used that stuff and it was fun to use. I had it out, so I made a bunch of backgrounds. Set aside to dry. Once dry I trimmed down to fit on a top folding black card base. 
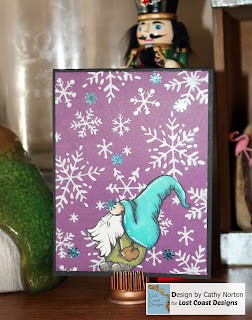
Next, I stamped the Profile gnome and a few others on some white cardstock and cut them out with my scan-n-cut. I then colored the Profile gnome with my Copic markers and added him to the front of my card. 
Lastly, I added some blue snowflake sequence to the card and of course one right on his nose.


Come join the gnome fun here.

Tuesday, December 4, 2018

Blue SnowWolf Queen

Welcome back to Lost Coast Portal to Creativity where Lost Coast Designs and Carmen's Veranda collide to bring you twice the inspiration and double the fun!

Hi all. Cathy here with my take on Cold and Frosty.
Stamps Used:
          Wolf Queen        
Snowflake set

I started out by stamping the  Snowflake set on white cardstock in blue distress ink. This will make your card base. Then cut a blue square and ink the edges with the same blue ink. Glue it on the stamped card base. Set aside.

Stamp Wolf Queen  on Copic friendly paper and color in. I added some blue glitter to the feathers so it has a little sparkle. On the stamp the feathers are held in her hair with a flower. I stamped a snowflake on some scrap paper and colored it in with the same distress ink I used to stamp the Snowflake background. Cut out and cover the flower.


Come show us your cold and frosty makes. You can add them here.

Saturday, December 16, 2017

Joyful Tag

Welcome back to Lost Coast Portal to Creativity where Lost Coast Designs and Carmen's Veranda collide to bring you twice the inspiration and double the fun!

Hello all Cathy here.  Today I made a tag for Christmas.  I started off with a #10 size office tag. I grabbed some Christmas colors of the Distress Oxide inks. (greens and reds and black for splatters) I took my craft mat and smooched the inks on it added water and put my tag in it. Dried one color and moved on to the next. When I'm happy with that I take the black ink and make splatters over the tag, set aside to dry.
Next I took Mistletoe Goth and stamped her on Copic friendly paper with black ink, colored her with Copic markers and then trimmed her down and cut her out.

 Now back to the tag. I took the small snowflake stamp set and Versa mark ink and stamped it on the tag. Then I used white embossing power on it.
Layering is the next step. I had some black paper on my table and I had my Christmas paper and washi tape on there too. I added the black and Christmas paper on the side. Added Mistletoe Goth to the middle and added washi tape to the top and bottom of Mistletoe Goth stamped image.
Last I added a Christmas token with some sparkle ribbon to the tag. Also added sparkle ribbon to the top. I call it done.
Please stop by leave you entry here for the  Winter/Christmas challenge this month.
Can't wait to see what you all come up with.

Wednesday, December 6, 2017

Raven's Winter

Welcome back to Lost Coast Portal to Creativity where Lost Coast Designs and Carmen's Veranda collide to bring you twice the inspiration and double the fun!

Can you believe it is Dec. 6th already.  Cathy here with a holiday card for you.  My idea when I made this it would go well for a Winter Solstice card.
 First off I stamped raven small right and left on the bottom of my white card panel.
There are two sizes of the raven so if you wanted a larger raven you can do that.

After that I picked out 3 different colors of Distress inks, a blue, a purple and a gray. Then I took my small snowflake set and stamped them in different inks all over the panel. Guess what?  Lost Coast Designs have a large snowflake set too.  So you have your choice of sizes. Large or small or a mix of both.
Then I distressed the edge of the white panel, inked the edge of it with the gray ink and set aside.
Next I took a black cardstock and made a top folding card and grabbed some more of the snowflakes. Can you believe there is 8 different snowflakes in that set? WOW!  I stamped them in Versa fine ink and embossed them with white embossing power.
(sorry about the flash)

I came back to the panel and colored in the ravens with Copic markers and added a hat to the left raven.  Wrapped white and silver bakers twine around the top and added a word token to it. Just to add some sparkle to it I added sliver tinsel to where the word token is.
Added foam tape the added it the black card and done.


I hope to see what you all are doing for your Winter/Christmas cards. You can join our challenge HERE for a chance to win some Lost Coast Dollars