Showing posts with label glitter. Show all posts

Saturday, November 30, 2024

Happy Holidays mini slimline

Welcome back to Lost Coast Portal to Creativity where Lost Coast Designs and Carmen's Veranda collide to bring you twice the inspiration and double the fun!

Hello, Cathy here with the last day of Gnome-vember.
Stamps Used:


I used the deer gnome, and I colored it with copic markers and cut out. I felt he needed a little sparkle for his hat. After I cut him out, I added some red stickles to it. I had to let it dry for bit. (I did overnight)
 
Next, I had some Christmas stocking paper I was going to place him on, but he needed to stand on something, so I added some black washi tape and a Happy Halidays sticker to the top and added it to a Kraft mini slimline card base and he is ready for me to send out as a holiday card.


Today is the last day to join the gnome-vember challenge.

Saturday, December 30, 2023

Deep Mid Winter - Happy New Year Ornament

Welcome back to Lost Coast Portal to Creativity where Lost Coast Designs and Carmen's Veranda collide to bring you twice the inspiration and double the fun!

Hello friends - as the year is drawing to a close, so is our current challenge In the Deep Mid Winter. 

Today I wanted to share with you an ornament I made to welcome in the new year...

I found a bunch of these neat wood ornaments at a garage sale this fall and I knew they would be so much fun to use.  I started off by inking up the ornament with a couple shades of pink Distress Oxide ink. I then added black ink for the ornament cap.  I stamped a few Large Snowflakes and Small Snowflakes around the edge. I then stamped Happy New Year from the Party Words set in the center. I added a bit of glitter here and there...because everything is better with glitter you know - LOL!!
 I finished off the ornament with a bit of die-cut pine branches a jingle bell and ribbon.

It's ready to be placed on the tree to help welcome in 2024!!

Hope you've all had an amazing year and if you haven't already take a bit of time to join in on the fun. All the best to you and yours in the coming year!


Sunday, December 24, 2023

In The Deep Midwinter - Let It Snow!

Welcome back to Lost Coast Portal to Creativity where Lost Coast Designs and Carmen's Veranda collide to bring you twice the inspiration and double the fun!

What's the Deep Midwinter without snow???


Today our little gnome friend is lobbying for a bit of the white stuff!

I started off by inking up a piece of white cardstock with various Distress Oxide inks. I then stamped the Trees background over top I added a bit of glitter to the trees here and there to mimic a bit of snow on the branches.   I then hand cut a couple snowdrifts and added a bit of ink and glitter.

I stamped the Front Sign Gnome on a scrap of white cardstock and colored him with Clean Brush Markers and wrote the little message on his sign. I finished him off with yes - more glitter (you can never have too much glitter - lol!!).  He was then fussy cut and affixed to the card using foam tape to make him pop off the background.

Do you have snow where you are for Christmas? 
We alas are having a warm and rainy Christmas...no snow in sight but we'll not let that dampen our spirits!


Wednesday, October 11, 2023

31 Days of Halloween - Day 11 - Frightful

Welcome back to Lost Coast Portal to Creativity where Lost Coast Designs and Carmen's Veranda collide to bring you twice the inspiration and double the fun!

Welcome to Day 11 of the 31 Days of Halloween...


Ahhh...another fun day of Halloween goodness.

For todays card I started off by applying 3 colors of Distress Oxide inks to a white card panel using an acetate circle to create a moon. I then flicked on a bit of water and blotted it off (creating such a lovely look).  I used the negative circle die to apply Brilliance White ink (give it a bit of shimmer) to the moon area.

 Next I stamped the Ledger background stamp using Dove Grey ink.   The Cityscape image was stamped along the bottom.  The Witch 2 was then stamped riding across the moon.  I used markers to color her in a bit.  Finally I used a glitter pen to add stars and outline the moon for a bit of sparkle.  I added the  "frightful" sentiment which I outlined with a marker.


Friday, September 8, 2023

Glitter Elk Skull

Welcome back to Lost Coast Portal to Creativity where Lost Coast Designs and Carmen's Veranda collide to bring you twice the inspiration and double the fun!

Hello, Cathy here with a glittery skull for you today.

Stamp Used:


I started out by stamping Large Elk Skull and colored it with copic markers. and I added some glitter pens to the top of the coloring.
Here is a different angle so you can see the glitter pens.


You can join the challenge here on the blog.

Monday, September 4, 2023

#174 - Bling It Up - High Kickin' Showgirls

Welcome back to Lost Coast Portal to Creativity where Lost Coast Designs and Carmen's Veranda collide to bring you twice the inspiration and double the fun!

The current challenge - Bling It Up has allowed me to use one of my favorite supplies...GLITTER!!!


I wanted to use the Showgirls stamp because of course they always like a bit of bling. Today they are decked out in red with lots and lots of red glitter!!  As I was assembling the card I decided that why not go for it and cut a full sheet of glitter paper for the mat.  You know you can never have too much bling - LOL!!  Anyway, this is my creation for this very fun challenge.  I hope you can join in on the fun for your chance to win.


Thursday, February 23, 2023

Make It Funny - Sarcasm x2

Welcome back to Lost Coast Portal to Creativity where Lost Coast Designs and Carmen's Veranda collide to bring you twice the inspiration and double the fun!

I hope you're all enjoying our current challenge... Make it Funny!
I had so much fun with this challenge I have not one but 2 cards to share with you today...


To get inspired for this challenge I went through my sentiments first then went ahead and created my card around it. For my first card today I fell in love with this sentiment Sarcasm is Forever. I knew I had to use the Party On old lady...I can see her saying this and tooting her own horn.  For the background I used the swirl stamp from the new Brush Strokes set and the Swimsuit Girl (fading out of course).  I had to add a bit of glitter just for that extra special something :)


Oh my next card is so me....sometimes I make it other times not so much - LOL!!  I started off by trimming a gel plate print for my black card. Inspired by this print I stamped the American Gothic Party image on yellow cardstock - something I almost never do (yellow is scary).  It was trimmed and mounted on the card.  I then stamped the sentiment My Greatest Accomplishment on a scrap of cardstock which I had previously stamped the grungy dots (from the Brush Strokes set) using Wild Honey Distress Oxide ink.

Be sure to join in on the fun....Make It Funny...


Friday, February 10, 2023

Glitter in your Heart

Welcome back to Lost Coast Portal to Creativity where Lost Coast Designs and Carmen's Veranda collide to bring you twice the inspiration and double the fun!

Hello, Cathy here with a card for you today.
Stamps Used:

I started off with a heart stencil and I used the new pink color of distress ink and blended it onto a pink card base. Then I took a stamp from the Pieces of Calligraphy and stamped it with a different color pink ink inside of the heart stencil. 
Next, I took the Winged skeleton and stamped it with black ink and cut out the inner circle of it. I added foam squares to the back and placed it in the middle of the card. I colored the heart with a red marker and I added some glitter to the top. 


You can join the challenge here

Monday, July 27, 2020

Pixie Christmas

Welcome back to Lost Coast Portal to Creativity where Lost Coast Designs and Carmen's Veranda collide to bring you twice the inspiration and double the fun!

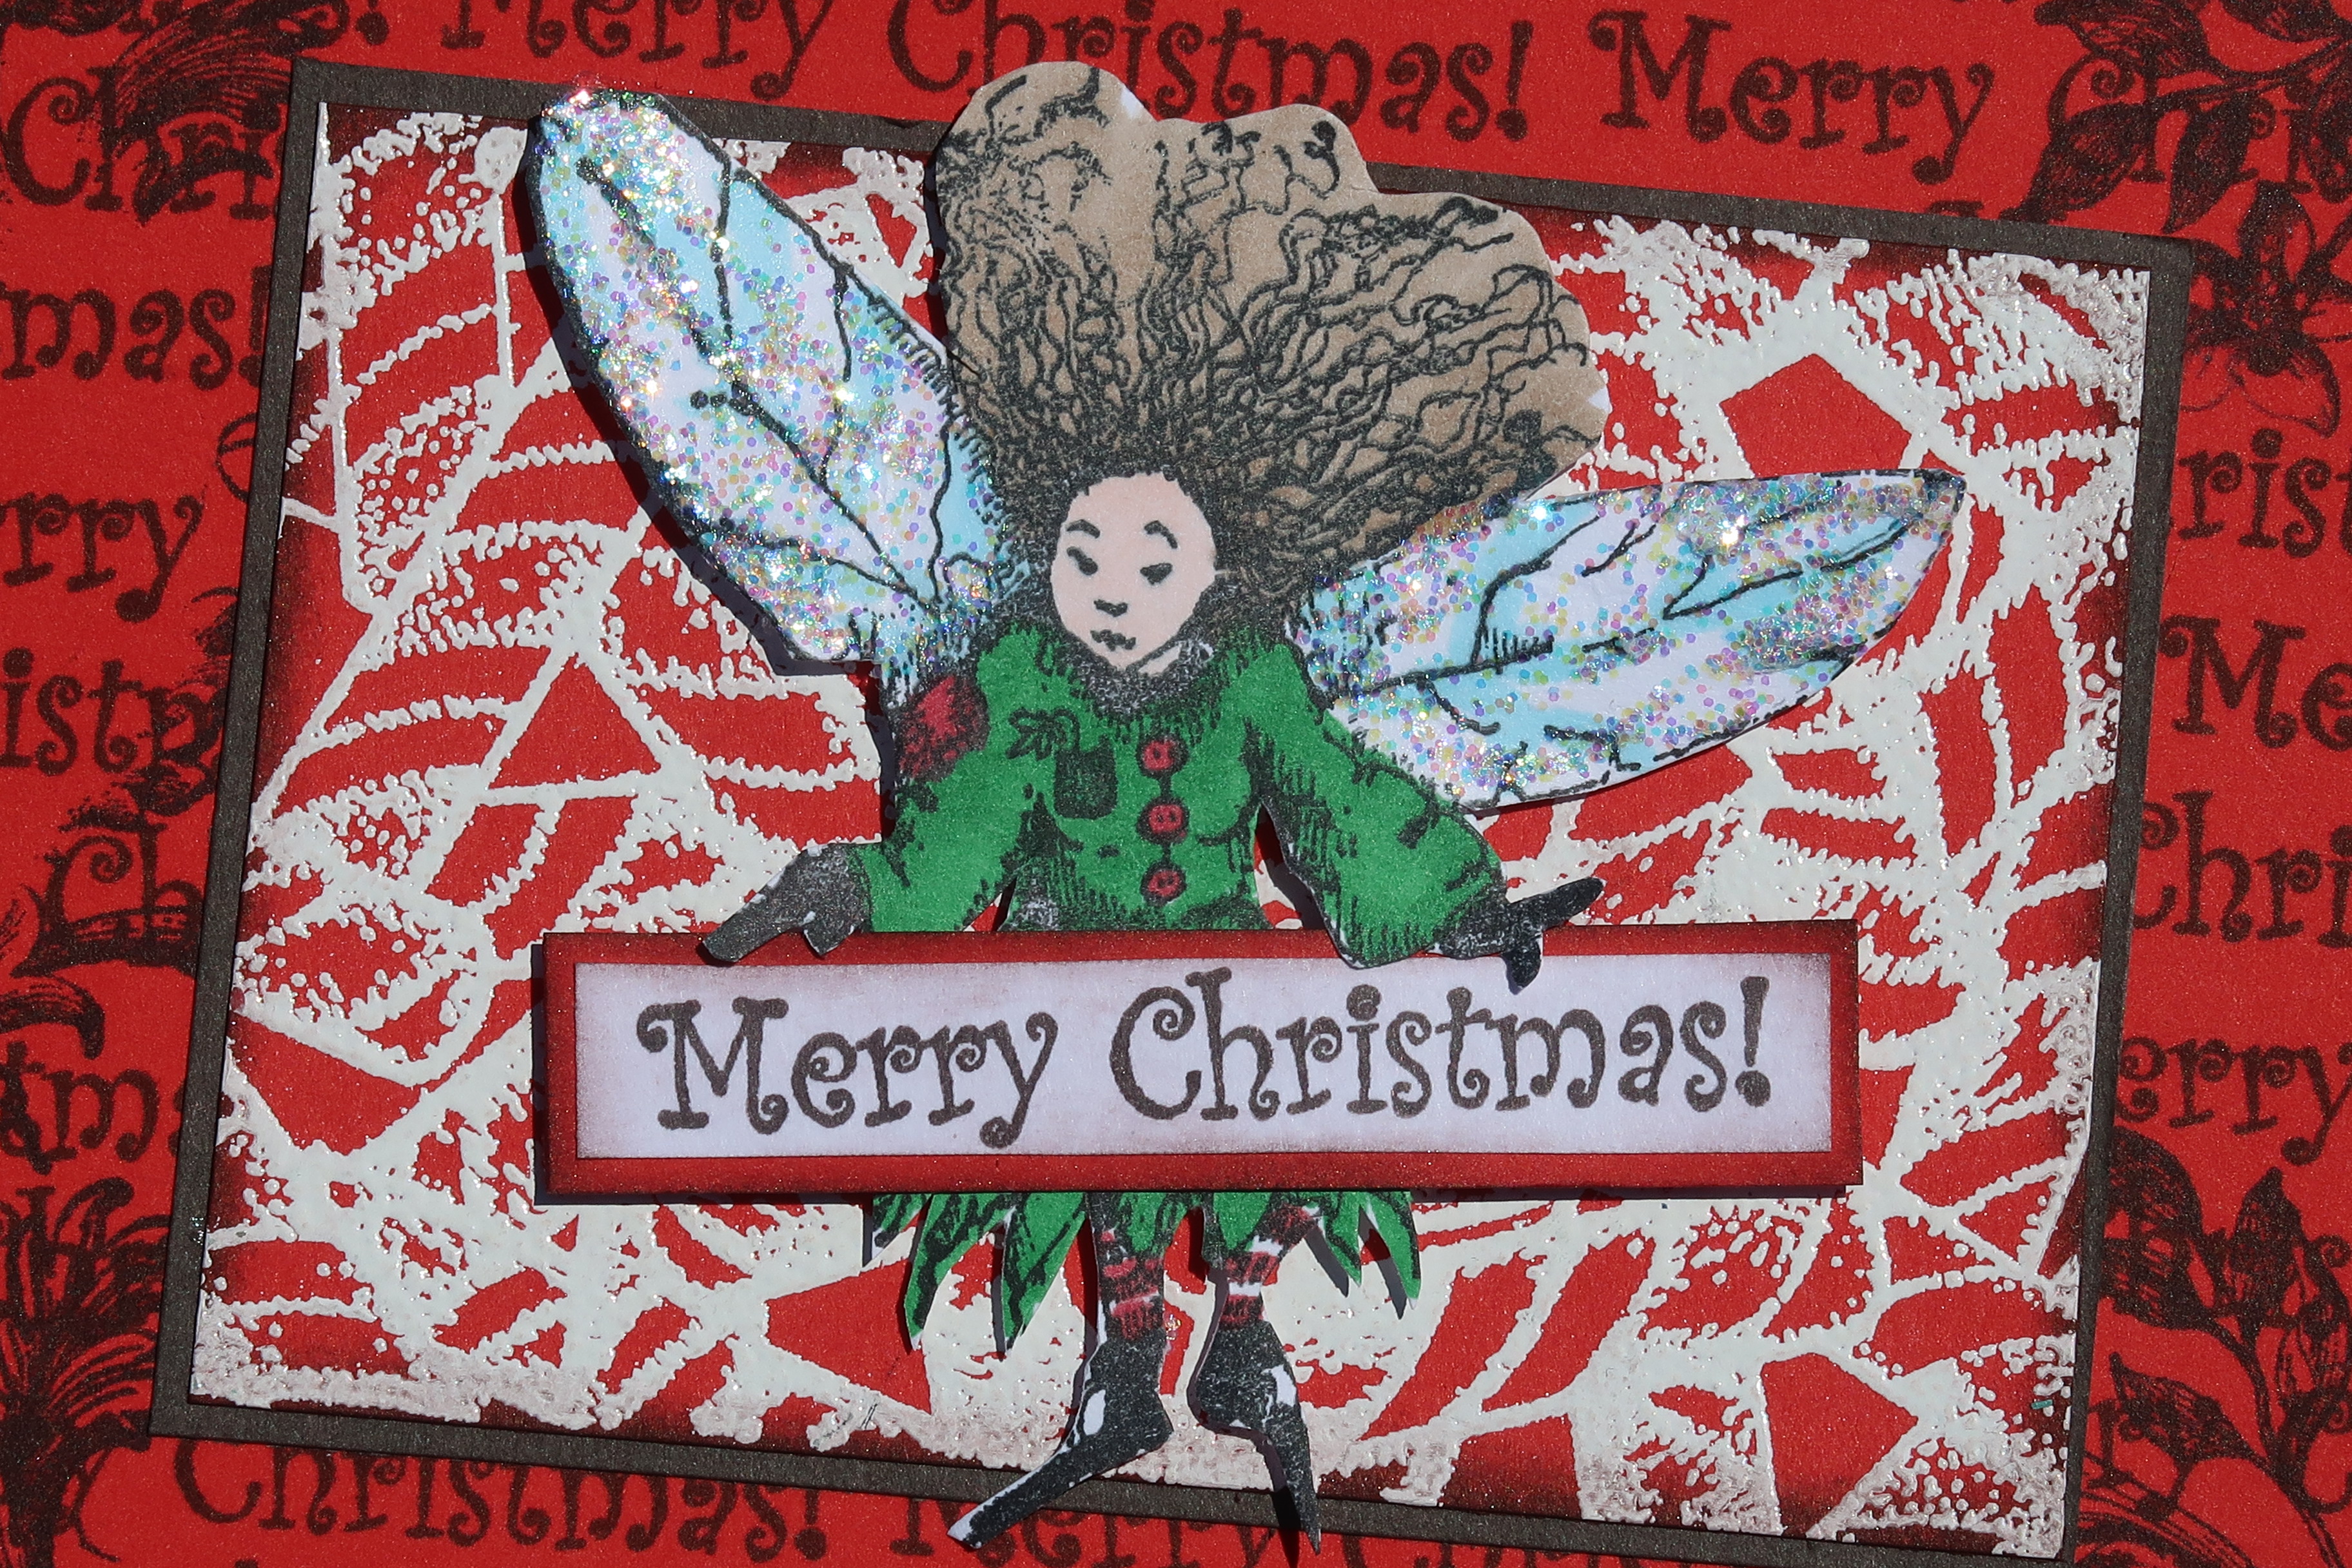
There's still time to join us for our Christmas in July Challenge and today I have a bit of Pixie Christmas for you...


Step 1 - Stamp the sentiment repeatedly over a red cardstock panel using Acorn VersaFine Clair ink.

Step 2 - Stamp the Daisy Flourish in the corners using Nocturne VersaFine Clair ink.

Step 3 - Cut a 2.25 x 3.25" red card panel. 

Step 4 - Stamp Candy Cane background on the panel with VersaMark ink.

Step 5 - Sprinkle white embossing powder over the stamped candy canes, shake off excess powder, heat to melt the powder.

Step 6 - Mat the candy cane panel with dark chocolate cardstock.

Step 7 - Stamp the pixie onto a piece of white cardstock and color as desired. Fussy cut the image.

Step 8 - Apply glue and a fine glitter to the pixie wings.

Step 9 - Stamp sentiment on white cardstock, trim and mat with red cardstock.

Step 10 - Mount the red background panel on a dark chocolate card base; affix the candy cane panel and then add the pixie.  Glue the sentiment so it looks like the pixie is holding the sentiment.


Be sure to join us before it's too late!


Supplies:


Imagine - VersaFine Clair - Nocturne, Acorn; VersaMark, White Embossing Powder

Glitter, Cardstock, Heat Tool

Tuesday, March 24, 2020

Flying Gnome

Welcome back to Lost Coast Portal to Creativity where Lost Coast Designs and Carmen's Veranda collide to bring you twice the inspiration and double the fun!

Cathy here with a flying gnome.
Stamps Used:
Pointy hat gnome
Cherry blossom 
Winged skeleton

So I started with the Pointy hat gnome stamp and color with Copic markers. Cut out.
Next stamp  Winged skeleton on a scrap piece of cardstock and color with Copic markers. I chose 3 light colors to color the wings. Cut out.
Tape the wings behind the Pointy hat gnome. I then added foam tape and set aside to make the background.

To make the background I used Distress sprays in purple, pink and blue. I sprayed the paper with water and then I sprayed the Distress sprays. I then took another paper and spritzed it  with water and laid it on top of the first one so I got 2 backgrounds from 1 (well 3 from all the over spray). Dry and then drip water on the background to make the spots.

Stamp Cherry blossom  to the top of the background. Move the stamp around to cover the top of it. Next add the your flying gnome to the front at a angle and then add sparkle to the wings and beard because your gnome is magickal and needs glitter.
So you can join the fun for this challenge here.

 Also Lost Coast and Carmen's Veranda is have a sale. Come check it out here.

Sunday, December 22, 2019

Let It Snow!!

Welcome back to Lost Coast Portal to Creativity where Lost Coast Designs and Carmen's Veranda collide to bring you twice the inspiration and double the fun!

We're celebrating "In the Deep Midwinter" with our current challenge and this is today's contribution...

LET IT Snow!!!!
(please!)

LCD Stamps:  MittsHLP, Small Cityscape (icicle)

I started off by applying lots of alcohol inks to the glossy cardstock and let it dry completely. I then stamped the small Cityscape along the edge of the card panel which when turned over creates the illusion of icicles! I covered these icicles with a bit of glitter for a bit of shimmer.

I then stamped the pixie onto the card panel and a second time on white cardstock. Since this image has lots of little fiddly bits that are very difficult to cut out, by stamping it on the card initially - I don't have to cut out all those tiny pieces. The second image I colored the pixies face and dress, cut those out and affixed it over the image stamped on the card panel.  I also added glitter to her wings as well.  

Finally the sentiment was stamped off to the side with Gothic Purple StazOn Ink.  This panel was mounted on a bit of Violet and Sapphire Starstruck Rinea Foiled Paper to really make the colors pop.

Hope you are having a lovely holiday season...

Merry Christmas everyone!

Roni

Thursday, October 17, 2019

31 Days of Halloween Day #17

Welcome back to Lost Coast Portal to Creativity where Lost Coast Designs and Carmen's Veranda collide to bring you twice the inspiration and double the fun!
Hello all. Cathy here with a CAS Halloween card.
Stamp Used:
Flying Monkey
So for this card I started out with 2 different color purple cardstock. I used a bat stencil with some black ink. Cut into different size strips. Add them to the front of a black card front. Stamp  Flying Monkey on white cardstock and cut out. I did not color it because I thought it stood out in all white. I did add glitter to the wings. It's a flying monkey of course it is going to have glittery wings.
Added some saying stickers and some bling. Card is done.

 Come join the fun here for the 31 days of Halloween celebration.
 
You can also join here for the Pets challenge 

Sunday, October 13, 2019

31 Days of Halloween Day 13 Frank's costume

Welcome back to Lost Coast Portal to Creativity where Lost Coast Designs and Carmen's Veranda collide to bring you twice the inspiration and double the fun!

Cathy here with day 13 in the 31 days of Halloween celebration.
Stamps Used:
Frank
Goth text for ATC
 So in my head as I was making this card I was having Frank going to a costume party.
I stamped Frank and colored him with copic markers. Cut Frank out and set aside.
To make the background I sprayed some distress ink sprays on watercolor paper in Halloween colors. Dry. Stamp Goth text for ATC randomly in black ink over the background.
Add some washi tape in spots also add a 31 die cut numbers to top of card.
Add Frank to bottom.
Now we make his costume. Add a glittery bowtie, a mustache and a monocle. Last we add a fragile sticker to his head.
Layer it on a black card base and you are done.
Join us an our 31 days of Halloween fun here.

Thursday, June 20, 2019

Out for a stroll

Welcome back to Lost Coast Portal to Creativity where Lost Coast Designs and Carmen's Veranda collide to bring you twice the inspiration and double the fun!

Cathy here with a fun card for you today. A ballerina taking a fish out for a under the sea stroll.
Stamps Used:
Ballerina with fish
Stay weird
Fish
So I started off with I think are index cards. I got them in a grab bag at a thrift store. I thought they were photo paper but they were not. I used dylusions  sprays on them. I sprayed 3 pieces so I could pick out the one I liked best.
 I stamped Ballerina with fish on white cardstock and color in with Copic markers. The outfit was the same color purple as the hat but a little paint drop changed the color of it to teal.
Anyway cut out and set aside.

 Next add some seaweed to the bottom of the card. Start off with some green ink through a stencil.   At this point stamp Ballerina with fish on the card so you know where to place it. Move the stencil and use paint to give it depth and texture. Set aside to dry.
 Stamp 3 Fish on top of the card.

Add your cutout Ballerina with fish on top of the one you stamped on you card. (this is where I messed up) Take that stencil again and with a different paint color add some seaweed in front of  
Ballerina with fish. For me I had to repaint the outfit and then I added some glitter dots to make it stand out.
Lastly stamp Stay weird on black cardstock and emboss with white power and cut out and add to card. Edge whole card with black ink.
Join the fun here at the blog or over at the Facebook group. Can't wait to see what you came up with.


Thursday, April 18, 2019

The sarcasm is strong

Welcome back to Lost Coast Portal to Creativity where Lost Coast Designs and Carmen's Veranda collide to bring you twice the inspiration and double the fun!
Hello all Cathy here with a fun card for you all.
Stamp Used: Flying Ballerina

I cut a square out of white cardstock and stamped  Flying Ballerina on it. I colored it with Copic markers and then I added glitter dots to the dress, set aside to dry.
 For my background I used some paper I made by spraying some shaving cream into a pan and spraying dylusions sprays on top. I wanted to see if it would work. It did. I have many background papers ready to go. The first ones I just left the spray with out mixing it. After a few pulls from that I started to "marble" it so it looks like the one in the photo. ( That is done with only 3 colors)
Here is a close up of the dress. I did a glitter to the wings but I could not get that to show up in the photo. I then added a snarky saying to the top. Added foam squares to the back.
Before I added it to the front of the card I die cut some flowers out of black cardstock and glued them to the card.
I hope you like my card I made for you today. Come join the fun for this challenge here.

Tuesday, December 4, 2018

Blue SnowWolf Queen

Welcome back to Lost Coast Portal to Creativity where Lost Coast Designs and Carmen's Veranda collide to bring you twice the inspiration and double the fun!

Hi all. Cathy here with my take on Cold and Frosty.
Stamps Used:
          Wolf Queen        
Snowflake set

I started out by stamping the  Snowflake set on white cardstock in blue distress ink. This will make your card base. Then cut a blue square and ink the edges with the same blue ink. Glue it on the stamped card base. Set aside.

Stamp Wolf Queen  on Copic friendly paper and color in. I added some blue glitter to the feathers so it has a little sparkle. On the stamp the feathers are held in her hair with a flower. I stamped a snowflake on some scrap paper and colored it in with the same distress ink I used to stamp the Snowflake background. Cut out and cover the flower.


Come show us your cold and frosty makes. You can add them here.

Saturday, November 10, 2018

Back to the Day of the Dead

Welcome back to Lost Coast Portal to Creativity where Lost Coast Designs and Carmen's Veranda collide to bring you twice the inspiration and double the fun!
Cathy here and I hope you liked the Blog Hop we had, but right now we are back to Day of the Dead Challenge.
Like my other card. I started off with a napkin. I glued the napkin on some cardstock. Set aside to dry.
Die cut the new skull from Tim Holtz out of white cardstock. Save eyes and nose. Color them with black ink.  Stamp on the skull with sketchy lily stamp   on the top of the skull. Then on the mouth stamp corner swirl stamp on it.
Then glue the skull in the cardstock napkin. Next add the eyes and nose back. Then you add a row of colorful flowers across the top of the skull. After that is done trace the sketchy lily with colored glitter. I also added some sliver glitter to the eyes and nose then I edged the whole thing with the same sliver glitter.
You can add you challenge make here.