Thursday, December 30, 2021

Gnome for Tea

Welcome back to Lost Coast Portal to Creativity where Lost Coast Designs and Carmen's Veranda collide to bring you twice the inspiration and double the fun!
 
Hello Portal Peeps.  I'm still folding and clipping and stamping and inking and making little gift bags and boxes.  Some are on my Nice List, some on my Naughty List.  This one is definitely NICE and so cute.  Especially when you add GNOMES!!!!!!
This is a lovely little quick and easy gift bag that has a pocket front and back and a little space in the middle for a bag of your favourite treats!  The gnome decided to fill this one with ChocoTea!!  Always a hit in my house.
I started with a 8" x 11 1/4" piece of card and stamped it with Lost Coast Designs Small Snowflakes and blue ink.  The card I picked was a little heavy.  Thin card is very good for this.  I scored all the lines and inked them.  Then you need to cut the four corner pieces off.
Fold
and fold.......
Add a couple of stamped, coloured and fussy cut gnomes.  I used Reindeer Gnome and one of the ones from Three Gnomes.
Front and Back.  Cute!!
You have until one minute to midnight 31st December to link up your gnome themed makes for a chance to win Lost Coast dollars.  Take care.  Have a very happy and safe New Year celebration.  See you on the other side...bwahhahaahahaha.


Wednesday, December 29, 2021

Gnome With Treats

Welcome back to Lost Coast Portal to Creativity where Lost Coast Designs and Carmen's Veranda collide to bring you twice the inspiration and double the fun!
 

Hello Portal Peeps!  Bonus Gnomey content!

  This week I'm the hostess at the Mod Squad Challenge and the awesome sponsor is Lost Coast Designs!!!  Yeah!!!   We hope you will play along!  I chose the theme New, so new year, new baby, new home, or maybe share some new crafty goodies you got for Christmas.  Just mention what you 'new' thing is if it's not obvious.  There's a chance to win wonderful Lost Coast Designs stamps.  

Here's my inspiration for you.  I am spending New Years Eve with a friend and I wanted to take a little gift, so I decided to make a self-closing box and decorate it with Lost Coast Designs stamps.

I folded the box from red Bazzill and then I stamped the pink panels with a new Lost Coast Designs background stamp called Flowers.  I stamped Front Sign Gnome, coloured and fussy cut him.  I stamped the Let's Party from the Party Words set on his sign, and also made a similar Happy New Year banner for the top of the bag.  Now I just need to fill it with something good!!

Thanks for visiting.  I am looking forward to seeing all your new things.  Hugz

Want more chances to win?? 

The Anything with Gnomes challenge runs until the end of the month on the Lost Coast Portal to Creativity blog.

AND........

 
Lost Coast Designs is also sponsoring the Sisterhood of Snarky Stampers 200th Challenge.  Yeah!!!!  They want you to make it Snarky bwahahahahaaa.   Hop over and join the fun there too!!  You can add your snarky things until 7th January.

Thanks for dropping by.  Hugz


Tuesday, December 28, 2021

Happy New Year gnomes

Welcome back to Lost Coast Portal to Creativity where Lost Coast Designs and Carmen's Veranda collide to bring you twice the inspiration and double the fun!

Cathy here with a New Year card.
Stamps Used:

I started out with the three gnomes and cut them out with my scan-n-cut and colored them with copic markers. I did add some sparkle to their hats with a sparkle gel pen. 
To make the background I used some sliver stencil paste and a star stencil. I then placed a sliver glitter paper strip on the bottom so the gnomes can stand on it. 
Stamp 2022 from the license plate alpha in purple ink and add to the top. There you have a gnomes new year's card.

You still have time to join the gnome challenge here.

Sunday, December 26, 2021

Gnomes: Happy New Year!

Welcome back to Lost Coast Portal to Creativity where Lost Coast Designs and Carmen's Veranda collide to bring you twice the inspiration and double the fun!

Hello everyone!
Liesbeth here with my last blogpost of this year! This lovely Gnome with her flower-hat wishes everyone a very good, happy and healthy 2022, and so do I !!😀💝


On a glossy piece of paper I fist stamped the Flowers Gnome  using black StazOn ink, and I masked her. I stamped the window (Door and window set) and removed the mask. After that I stamped the text from Party words. I sponged the edges with Distress ink Vintage photo and coloured the other parts with blue, pink and brown Distress inks, using a q-tip. I finished the card with lots of Stickles (glitter glue)


Liesbeth XX


Saturday, December 25, 2021

May Your Christmas Sparkle

Welcome back to Lost Coast Portal to Creativity where Lost Coast Designs and Carmen's Veranda collide to bring you twice the inspiration and double the fun!

Good morning and a very Merry Christmas! Are you on Santa's naughty or nice list?? I hope that he's visited, and that you've put a carrot out for Rudolph.  It's Sue here with my sparkly Christmas card for our Gnomes challenge.


I started by making my base. This is one piece of 12x12 card with the different coloured dots on either side.

And these are some of our fab new gnomes (though gnomes aren't just for Christmas!) I cut my Santa gnome twice as I wanted to layer him up.


Here he is, coming down the gnomey mushroom chimney

And all layered up and glittery.


Well would you believe it, the card fits perfectly into the envelope that I made last time lol.

For the card, I've used

and for the envelope

May I take this opportunity to wish you all a very Merry Christmas and a happy and healthy new year from myself and all of my teamies. Take care, and have a wonderful day! xx


Friday, December 24, 2021

Gnomes: Merry Christmas!!

Welcome back to Lost Coast Portal to Creativity where Lost Coast Designs and Carmen's Veranda collide to bring you twice the inspiration and double the fun!

It's Christmas Eve, which means we have a week left of our Gnomes challenge here on the Portal.  Hi, it's Laurie here with a Christmas Eve Santa Gnome to wish you a very merry holiday.
This is the Pompom Gnome stamp from Lost Coast Designs featured on this holiday tag I have put together.  

This background is a piece from a larger page that I have cut down to tag size.  I used a piece of vintage music paper and, using Modge Podge, glued this holiday rice paper to my book page.  I love the transparency that you get when using tissue paper or rice paper. You always get a little peek at what is beneath!  I edged the tag with some Vintage Photo Distress ink and punched a hole in the top for some red ribbon.  I added some decorative red trim to the bottom of the tag.

My Pompom Gnome was stamped onto white paper with black ink and colored with Copic Sketch markers.  I fussy cut him out and attached him with foam tape to my tag front.  A pompom was added to the tip of his cap, which goes right along with his name!

Simple, quick, and fun!  Please be sure to share your Gnome projects with us before the end of the month, and you may win some stamps from Lost Coast Designs and Carmen's Veranda.  Don't forget to feature rubber stamping in your projects!

Merry Christmas from Pompom Gnome and me!


Wednesday, December 22, 2021

Christmas Gnomey Mail Art

Welcome back to Lost Coast Portal to Creativity where Lost Coast Designs and Carmen's Veranda collide to bring you twice the inspiration and double the fun!

 Good morning and a very happy Wednesday. It's nearly Chrisssssssssstmassssss!!! It's Sue here with my second Gnomes project, and this time I've decorated an envelope.


This time I've decided to make an envelope for one of my gnomey Christmas cards.


I started by stamping my corner images, then I did a bit of masking (unheard of for me) and stamped my Christmas lights. All of the images have been coloured with my Prisma pencils as envelopes aren't as sturdy as card.

These are my lovely stamps, I've used


I hope you like it, and that you join in with our fun challenge. Please remember the golden rule - real stamps only, no digis!

Take care, and have a very happy week x


Monday, December 20, 2021

#134 Gnomes, What a fun challenge at Lost Coast designs.

Welcome back to Lost Coast Portal to Creativity where Lost Coast Designs and Carmen's Veranda collide to bring you twice the inspiration and double the fun!


Hi, Riet here.
What a fun challenge
Do you also love gnomes?
As this is my last contribution to Lost Coast designs this year, 
I bring you this last Christmas greeting.
I wish you all a very merry and loving Christmas.
And a happy new year to everyone.
I am back at LCD on the 1sth of Januari.

The stamp is the Sweater Gnome,
With the help of some maskingtape I stamped the sweater gnome 3 times.

 I colored the gnomes with pencils and drew some things on the hat with a white gelpen,
 so that it looks like 3 different gnomes. 
Take 5 sticks of 20 cm wood and paint them. 
Make the star as shown in the picture. 
I glued the star first and later tied the twine around the ends. 
Glue the gnomes on it.
Glue a Christmas greeting on it and you're all set. 
This is so nice to give as a gift, or hang it in your tree.
The challenge runs until the end of the month, so you can still participate. 
Click on the link and join the fun, and maybe you'll be the winner of new rubber this month.


Saturday, December 18, 2021

Happy Birthday Gnome

Welcome back to Lost Coast Portal to Creativity where Lost Coast Designs and Carmen's Veranda collide to bring you twice the inspiration and double the fun!

Cathy here with a birthday gnome card.
Stamp Used: Side Sign Gnome

This was a fun and fast card to make. This one of the gnomes I had cut out with my scan-n-cut. It is Side Sign Gnome. I cut off the sign. I used my Copic markers to color him.  
I made him stand on a saying sticker and he is holding some balloons for your birthday. 


Come join the gnomey fun here.

Thursday, December 16, 2021

Gnomes: reading Gnome

Welcome back to Lost Coast Portal to Creativity where Lost Coast Designs and Carmen's Veranda collide to bring you twice the inspiration and double the fun!

Hi everyone, welcome again to our Anything goes with Gnomes' challenge! Today it's my (Liesbeth) turn. This reading little Gnome is so lovely! 💓 Grab your Gnomes and stamp along with us!


This is how I made this card: I stamped Carmen's Veranda Compass Square four times (using a stamp positioner) with different light inks on a piece of paper and sponged here and there with the same four colours. With black ink, I stamped the tree, (a first and a second print as you can see), the crown and the script at the bottom and the text.(ATC birds in trees, Tree crown, Pieces of CalligraphyTravel Quotes) I stamped the Book Gnome on a seperate piece of cardstock, coloured it with Zig-markers and cut it out. I glued the Gnome onto the card and finished the card with gel pens and Zig-markers. I sponged the edges with black ink.


Liesbeth XX


Tuesday, December 14, 2021

Gnomes! Two Gnomes Gift Card Holder

Welcome back to Lost Coast Portal to Creativity where Lost Coast Designs and Carmen's Veranda collide to bring you twice the inspiration and double the fun!

Hi from Laurie, back with another Gnome creation for our month long challenge here on the Portal.  This time I have created a little gift card holder, which you could make in any colors suitable for any occasion. In this case, I went with Christmas colors.

This was made using the Two Gnomes stamp from Lost Coast Designs.  I started by stamping my gnomes with black ink onto first white, then green and then pinkish-red paper.  I fussy cut the gnomes from the white paper, then cut corresponding bits of clothing, hats, and shoes from the green and pink paper and glued them atop the original stamped images as shown.  I decided it would be fun to mix and match their colors rather than make one all green and the other all pink.  A bit of color was added to their noses and mouths with a Copic sketch marker.

The card holder itself is a piece of green cardstock cut to fit a gift card and my stamped image.  I die cut a circle from some coordinating Christmas paper and glued that to the front of the card holder.  I glued the gnomes atop the circle, punched a hole in the right side and threaded some twine through it to tie the card holder closed.  Last step was to round the corners as shown.

Inside I used the same coordinating paper to create a little pocket for the gift card, glued it in place and tucked the gift card inside.  I finished it off with a bit of die cut trim in the same paper along the top edge.

Now it's your turn to show us what fun things you can create with a Gnome theme.  Be sure to feature some rubber stamping in your projects for a chance to win some free stamps from Lost Coast Designs and Carmen's Veranda!


Sunday, December 12, 2021

Watching snowflakes

Welcome back to Lost Coast Portal to Creativity where Lost Coast Designs and Carmen's Veranda collide to bring you twice the inspiration and double the fun!

Hello, all Cathy here with a snowflake gnome card for you.
Stamp used: Profile gnome

I started out with some purple cardstock, and I used a snowflake stencil with some white stencil paste. I have never used that stuff and it was fun to use. I had it out, so I made a bunch of backgrounds. Set aside to dry. Once dry I trimmed down to fit on a top folding black card base. 
Next, I stamped the Profile gnome and a few others on some white cardstock and cut them out with my scan-n-cut. I then colored the Profile gnome with my Copic markers and added him to the front of my card. 
Lastly, I added some blue snowflake sequence to the card and of course one right on his nose.


Come join the gnome fun here.

Saturday, December 11, 2021

#135 Anything go's gnomes, gnome tag.

Welcome back to Lost Coast Portal to Creativity where Lost Coast Designs and Carmen's Veranda collide to bring you twice the inspiration and double the fun!


Hi there, Riet here 
We have another fun challenge at Lost Coast designs.
A whole month its all about gnomes.
If you dont have a LCD gnome, dont worry, 
it is allowed to use other brands.
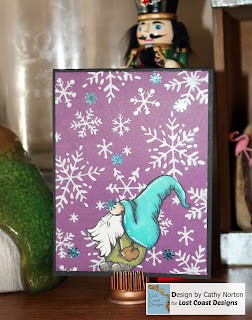
I stamped a tag this time.
Pretty easy and quick to make.
So here is the step by step explanation.

What I used:
Carmens Veranda sentiment.
Click on the stamps to take you to de website.


Distress Oxide and distressink,
Pink flamingo,
Peacock feathers,
Diamond stencil,
Color markers,
Versafine onyx black,
Small ruler or a plastic card.
White posca pen.

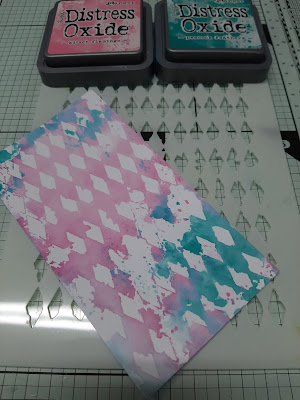
Take a piece of paper or a tag.
Spread some distress oxide in both colors evenly over the stencil. 
Spray water over it.
Press the stencil onto the paper as if you were stamping.
Dry it with the heat tool.
Now take the stamps and the distressink.
Stamp like the example or as you see fit.
Take the ruler and the Versafine.
Swipe the pad with the ruler to apply the black ink to the edges. 
Splash some black ink or paint over the tag.
Stamp with Versafine the gnome.
Color the gnome and cut her out.
Gleu her to the tag.
Well you won't believe it, but even though I use a stamping aid,
My text doesn't often have a nice straight line, LOL.
You'll probably be better off than me, 
so stamp the sentiment with versafine.
This text is from Carmens Veranda,
on the CV site you will find a whole page with the most beautiful and funniest text stamps.
Stick a piece of black cardstock to the back and you are done.
Hope you have fun in creating your gnome card, tag or anything you want to make.
And please share your art with us and join the challenge.
There are rubber stamps to win so come and participate.