Showing posts with label embossing. Show all posts

Friday, October 25, 2024

31 Days of Halloween Day 25

Welcome back to Lost Coast Portal to Creativity where Lost Coast Designs and Carmen's Veranda collide to bring you twice the inspiration and double the fun!

Goodmorning, Cathy here with a Halloween card for you.

                                                               
                                                                        Stamps Used:
                                                            Lost Coast Designs Spiderwebs background
                                                             Carmen's Veranda Pumpkin 
I started by stamping the Spiderwebs background on some pattern paper and cut out. I then stamped the Pumpkin on some orange cardstock and heat embossed it with black.

I colored it with copic markers and cut out. I added the whole thing on a black card base and added hocus pocus to the top.

Come join the Halloween challenge over at the Lost Coast blog

Sunday, January 14, 2024

Purple Postcard

Welcome back to Lost Coast Portal to Creativity where Lost Coast Designs and Carmen's Veranda collide to bring you twice the inspiration and double the fun!
Goodmorning all, Cathy here with a postcard for you. 

Stamps Used:


I started out with a watercolor postcard. I stamped a corner(ish) stamp from the Pieces of Architecture and I heat embossed it with white embossing power. 
Next, I used some Lindy's magical shaker pigment powers. I didn't realize they had shimmer in them. Where the embossed areas are the powers didn't go. 
I then took Daisy FlourishPieces of Architecture, and Brush stokes and stamped them around the sides of the postcard in purple distress ink.
After that I stamped a stamp from Fortune men set in black ink to stand out. Lastly, I added some black paint splatter to the whole thing. 

Come join our new month-long challenge over on the blog.

Wednesday, August 30, 2023

Steampunk/Vintage Challenge - Steampunk Mermaid

Welcome back to Lost Coast Portal to Creativity where Lost Coast Designs and Carmen's Veranda collide to bring you twice the inspiration and double the fun!

Our current challenge - Steampunk/Vintage is quickly coming to a close.  You still have a bit of time to join in on the fun and today I have my final Steampunk card to share with you...my Steampunk Mermaid.


I started off by stamping the Steampunk Mermaid on a piece of vellum using StazOn ink.  Once the ink had dried I colored the back of the image with a variety of markers and left her to dry.  After the inks had dried I tore the edges and set aside.

I created the background with pigment powders in shades of blue. I stamped the Gears background stamp using VersaMark ink and embossed it using gold, silver and copper embossing powders.  I crumbled up the mat several times to give it a distressed look, scraped the edges with an envelope opener then mounted it onto a blue card.

The Steampunk Mermaid was affixed to the card using liquid glue in the two corners which I covered up with a few metal gears.

I hope you have a bit of time to join in on this challenge...


Sunday, August 20, 2023

A Piece of the Steampunk Puzzle

Welcome back to Lost Coast Portal to Creativity where Lost Coast Designs and Carmen's Veranda collide to bring you twice the inspiration and double the fun!

Hello hello my friends!! Another fun Vintage/Steampunk creation to share with you...this time it's a very large piece of the puzzle...


I don't know about you but sometimes I like make things other than cards to stretch my imagination. One of my favorite alternatives to cards are puzzle pieces...every shape and size lend themselves to art.  Today's piece is about 5" tall which is quite a nice size to stamp on.  

The process....  

I started off by painting the puzzle piece with black acrylic paint. 
Once it had dried I stamped the Gears background stamp on to the piece using VersaMark ink.  
I sprinkled silver, ancient gold and verdigris embossing powders over the ink - shook off the excess and heated to melt.
A dauber was used to apply more VersaMark ink along the edges.
I then sprinkled with Copper ep, heated and melted.

For now the puzzle piece is finished.

The STP Dirigible image was stamped onto grey/blue cardstock using VersaFine Clair Nocturne ink. 
The image was colored using KingArt brush markers after which it was fussy cut from the cardstock.
The word Fly from the Misc Words set of stamps was stamped onto a gel plate scrap of paper and matted with metallic copper cardstock.

The Dirigible and word were then affixed to the puzzle piece with foam tape.


Wednesday, August 2, 2023

Challenge #172 - Summertime - Beauty Fades

Welcome back to Lost Coast Portal to Creativity where Lost Coast Designs and Carmen's Veranda collide to bring you twice the inspiration and double the fun!

Hello my inky friends! Roni here with my first card for the brand new challenge - #172 Summertime!


To get into the Summertime spirit of things I went bright...really bright for the background. This is out of my wheelhouse but I really like how it turned out. To begin I stamped Sun Tiles (Carmen's Veranda) onto a piece of white cardstock using VersaMark ink and  then embossed it with white EP.  I then had a bit of fun with pigment powders in Lime Green, Yellow and Orange.   I maybe over did it with the orange but with the powders you never can tell until you hit it with water - LOL!!  This piece was trimmed to fit an A2 size teal card.

Next I stamped the Swimsuit Girl onto a piece of cardstock and fussy cut her.  I stamped the Beauty Fades sentiment on a piece of the scrap (from the background), mounted it on teal cardstock and mounted both onto the card.


Monday, February 6, 2023

Love and Hearts Challenge - Sweet Love

Welcome back to Lost Coast Portal to Creativity where Lost Coast Designs and Carmen's Veranda collide to bring you twice the inspiration and double the fun!

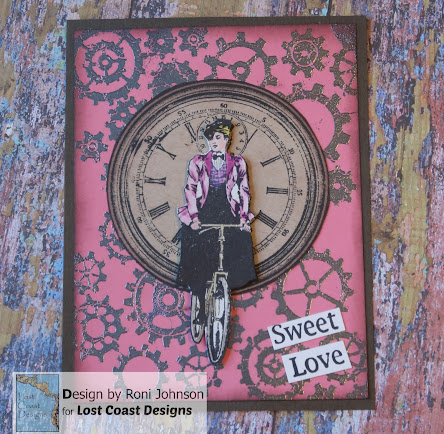
Ink Stained Roni here...I hope you're enjoying the current challenge Love & Hearts. Today I have a little "steamy" card for you - Sweet Love.


I love everything Steampunk so I thought it would be fun to create a Valentine's Day card for my sweetie using the new Gears background by stamping it with VersaMark ink on pink cardstock then embossing with Hematite EP.  


I then stamped the Steampunk Bicycle Lady twice, once on kraft colored paper and once on a piece of grey cardstock. The clock was trimmed from the kraft paper and inked along the edge with Pine Cone VersaFine Clair ink.  The Bicycle Lady was trimmed from the grey cardstock and colored using a variety of colored pencils.  The Clock was mounted directly to the pink card and the lady was adhered using foam tape.  To finish off the card I stamped "Sweet Love" from the set Misc. Words.

Hope you join in on the fun with our Love and Hearts Challenge!
You might just be the lucky winner.


Monday, July 18, 2022

Sugar Plum Fairies

Welcome back to Lost Coast Portal to Creativity where Lost Coast Designs and Carmen's Veranda collide to bring you twice the inspiration and double the fun!

Hello Cathy here with a card for you. 
Stamps Used:

So, I was going for sugar plum fairies dancing in your head. I guess I should have gone with a purple color to stamp the thin dancer but I picked blue. I then cut them out and set aside. 
Next, I stamped a snowflake from small snowflake set  with versa mark ink and used white embossing power. I then took a white gel pen and added white dots around the background. On some of the white dots I added some lines coming out of it.
I glued the sugar plum fairies on the card and added the saying to the bottom. 

You can join the Christmas in July challenge here.

Sunday, October 10, 2021

31 Days of Halloween: Day 10 Ghostly Pumpkin

Welcome back to Lost Coast Portal to Creativity where Lost Coast Designs and Carmen's Veranda collide to bring you twice the inspiration and double the fun!

Hello all Cathy here with day 10
Stamps Used:


I started out by making a background with some different color oranges of distress. I also used the new mica spray of distress. Next I stamped the Pumpkin and I then heat embossed it. Cut it out and set it aside. 
The background of my black card base is done with a stencil and some white ink. 


I die cut some ghosts from white cardstock and inked them up with a distress ink and then I stamped Pieces of calligraphy  ink that same ink on the ghosts. 
Next I arranged the ghosts and  Pumpkin on the front of the card and glued them on. 
Last I added a Happy Halloween in green and purple paper from a die cut. Layered it 3 times.
Added the same paper as layers under the card.


I hope you will join the Halloween challenge here


Sunday, August 22, 2021

Let coffee choose

Welcome back to Lost Coast Portal to Creativity where Lost Coast Designs and Carmen's Veranda collide to bring you twice the inspiration and double the fun!

Hello Cathy here with a card for you today.
Stamps used:
I just started playing with some distress oxide sprays and a distress spray stain. I just knew I wanted to use the new distress mica stain. You can't see it in the photo but it is the gray in the background. I sprayed them directly onto the paper and then took another piece of paper and placed it on top so I get 2 for 1 with that. 

 Next I stamped Praying angel in black ink on it. After that I stamped Pieces of Calligraphy in gray ink around it.
Lastly I stamped Power of coffee saying on black ink and white heat embossed it. I cut it apart and added to the card. I felt the saying went perfectly with the image.


I hope you will join the fun challenge

Friday, February 12, 2021

Always and Forever

Welcome back to Lost Coast Portal to Creativity where Lost Coast Designs and Carmen's Veranda collide to bring you twice the inspiration and double the fun!
Cathy here with a card for you
Stamped used: 

I started off by stamping Wings and embossing in gold. Cut out. Next take some black and white pattern paper I picked a Valentines theme and cut out a panel for the front of the card. Then layer it onto a red mirror cardstock. Add some foam to the wings and then add them to the front in the center. Add a saying. Mine I picked one that you could use for Valentines. Place that on a black card base. Lastly add a gold strip on the bottom to tie it all together.  

I hope you join the challenge here

Tuesday, December 22, 2020

2021 Here We Come!!

Welcome back to Lost Coast Portal to Creativity where Lost Coast Designs and Carmen's Veranda collide to bring you twice the inspiration and double the fun!

Hello and welcome to the Winter Blues Challenge...still lots of time to play!

Time to say good bye 2020 and
Hello to 2021!!


Here's to a better year to come!

I created this card by applying assorted shades of blue Brusho Colour Crystals to a piece of cardstock. I then stamped and embossed both Large and Small Snowflakes over the card.  Next I stamped Pieces of Calligraphy over the snowflakes and wiping away the text from the embossed areas. The Heart from the ATC Doodles set of stamps was stamped on a piece of handmade paper and the excess paper torn away to create the feathered edges. This heart was then covered with glitter.  The sentiment from Party Words was stamped on a piece of scrap paper and affixed to the heart.

Today is my final post for Lost Coast Designs/Carmens Veranda. I wanted to thank you all for my wonderful stay here. Wishing you all the best in the remainder of 2020, in 2021 and for years to come!

Hope you join in this month long challenge!!


Tuesday, December 15, 2020

Snowflake Gnome

Welcome back to Lost Coast Portal to Creativity where Lost Coast Designs and Carmen's Veranda collide to bring you twice the inspiration and double the fun!

Cathy here with a snowflake gnome card for you.
Pompom Gnome

I started off by painting the background with different colors of blue distress sprays. I put a few drops on my craftmat and dry brush it on. 
After that was dry I used sliver embossing and enbossed the Snowflake set . I layered it on to a blue shinny paper and added some snowflake diecuts. 
I then stamped and colored the Pompom Gnome with copic markers. Cut out and added to front. Layer it on the front of a white card.


Come join the winter blues fun here. Also the sale is still going on to get 25% off. Check it out.

Thursday, December 10, 2020

Mistletoe Goth

Welcome back to Lost Coast Portal to Creativity where Lost Coast Designs and Carmen's Veranda collide to bring you twice the inspiration and double the fun!

Oh how I love this challenge - Winter Blues - where your creations can be filled with winter goodness or BLUE (my fav. color!!)

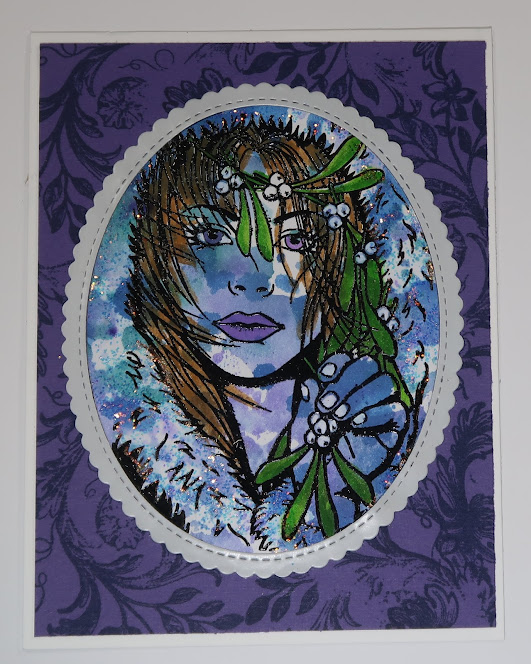
So today I have this beautiful lady to share with you....


She is Mistletoe Goth and was stamped/embossed on a piece of alcohol inked paper. After she was embossed she was colored with alcohol markers, die-cut and mounted on a blue panel which was stamped using the Daisy Flourish stamp.  That panel was then mounted on a white card base. To finish off the card I added glitter to her fringe.

Hope you join in this month long challenge!!


Tuesday, November 10, 2020

Bouquet of Roses

Welcome back to Lost Coast Portal to Creativity where Lost Coast Designs and Carmen's Veranda collide to bring you twice the inspiration and double the fun!

Welcome to Challenge #110 - Spooktacular Floral

I love this challenge...check out why....


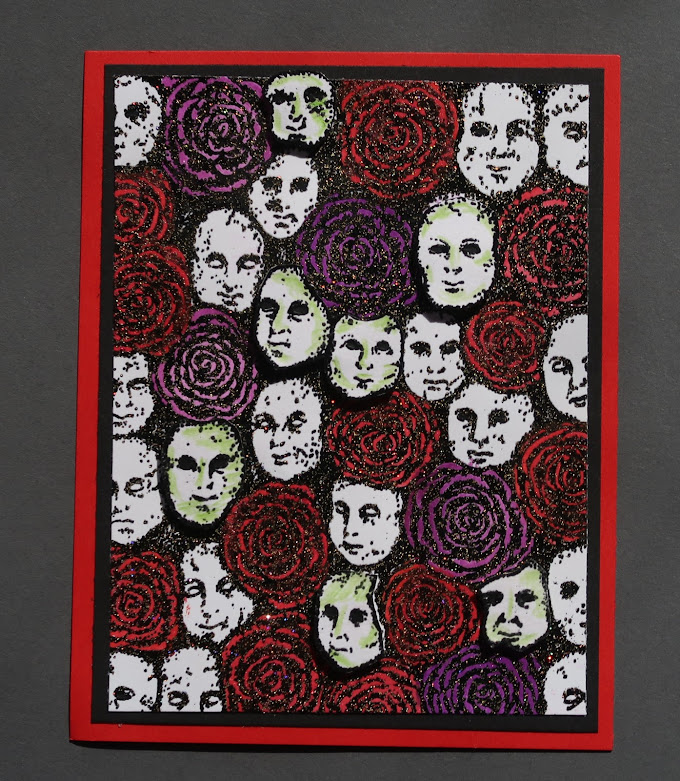
Isn't this a wickedly fun image!! Who'd have thought a bouquet of flowers with creepy little doll faces thrown in for fun - LOL!!  I love it!  It's called Heads & Roses Background.


This card was made by stamping the image once with VersaFine Clair Nocturne and once with VersaMark ink and embossed with New Years Eve Mboss embossing powder (black & glitter!!). The flowers were all colored using Marabu Art Crayons and left to dry. I fussy cut select doll faces from the plain stamped image, colored with a green colored pencil then affixed them to the embossed panel using foam tape. It really is quite creepy seeing them pop out of the background!  This panel was then mounted on a black mat which in turn was affixed to a red card base.


Such a fun and creepy card don't you think?

Have a spooky day my friends!
Roni

Supplies:

Carmen's Veranda - Heads & Roses Background
Imagine - VersaFine Clair, VersaMark, Mboss - New Years Eve
Marabu Art Crayons
Colored Pencils, Foam Tape, Cardstock

Tuesday, October 20, 2020

31 Days of Halloween #20 / Challenge #109 Furry Friends - Halloween Kitty

Welcome back to Lost Coast Portal to Creativity where Lost Coast Designs and Carmen's Veranda collide to bring you twice the inspiration and double the fun!

We are now into our double challenge in October festivities.

We're combining the 31 Days of Halloween AND Challenge #109 - Furry Friends!  
Of course you don't have to do both but it's always fun to see what we can come up with.

Today I wanted to share my sweet Halloween Kitty....


To create this card I stamped the Large Peekaboo Kitty on dark grey cardstock using VersaMark ink which was then embossed with Black Mboss embossing powder. The kitty was then shaded with white pigment ink and glitter gel pens to color the ears, nose and eyes. The kitty was then fussy cut and popped onto a card that I had added some bits of halloween pattern paper in my stash.  I stamped bits and pieces of the Spiderwebs Background image onto a piece of taupe colored cardstock to which the sentiment was added.


Happy Meow-loween!
Roni

Supplies:

Carmen's Veranda - Large Peekaboo Kitty
Lost Coast Design - Spiderwebs Background
Imagine - VersaMark, Mboss embossing powder, StazOn Pigment Ink - Cotton
Glitter Gel Pen
Pattern Paper, Cardstock

Tuesday, October 13, 2020

31 Days of Halloween Lucky #13 - A Touch of Elegance

Welcome back to Lost Coast Portal to Creativity where Lost Coast Designs and Carmen's Veranda collide to bring you twice the inspiration and double the fun!

We're up to Lucky #13 in our 31 Days of Halloween and today I have a touch of elegance for you....


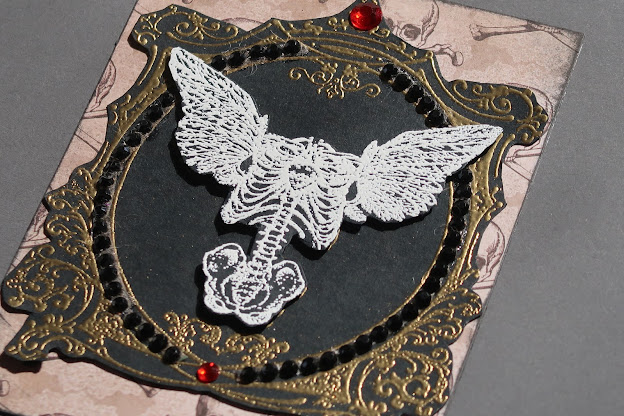
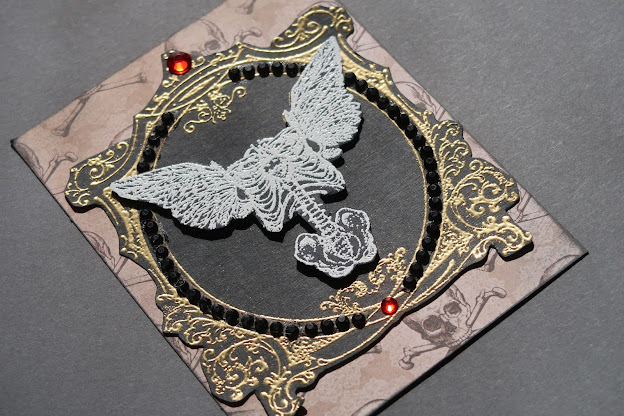
Would you believe that this is one stamp? 

It is, it's called Winged Skeleton from Carmen's Veranda. 


I stamped this image twice onto black cardstock and embossed one image with gold and the other with white embossing powders. The white skeleton was fussy cut out of the frame and the gold image was fussy cut as a whole. I added black and red gemstones to the image which was then mounted on the skeleton pattern paper (which was mounted on a card base). I then added the white winged skeleton to the card using foam tape.


It's such a striking image all gussied up don't you think?

Happy Day friends!
Roni

Supplies:

Carmen's Veranda - Winged Skeleton
Imagine - VersaMark, Mboss Embossing Powders
Faux Gemstones, Foam Tape, Cardstock, Pattern Paper

Saturday, October 3, 2020

31 Days of Halloween Day 3 - Wicked

Welcome back to Lost Coast Portal to Creativity where Lost Coast Designs and Carmen's Veranda collide to bring you twice the inspiration and double the fun!

Ahhhh - Halloween!
Don't ya just love it?

This is my favorite time of the year!

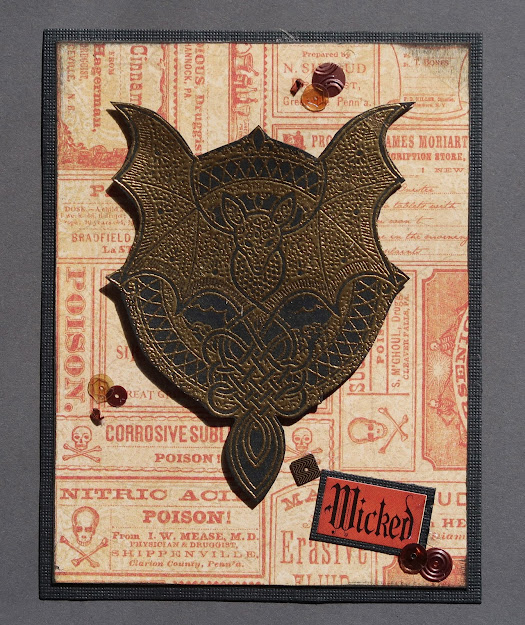
I wanted to share my first creation for the 31 Days of Halloween....Wicked!


I absolutely LOVE this stamp from Teri Sherman - Batty It's got such lovely intricate details that you just have to see to believe. I used it on this card by stamping with VersaMark ink then embossing with Gold Mbossing powder from Imagine. It really pops on the black cardstock. 


I trimmed this fun Halloween paper and mounted it on a black card base. Once the image had cooled it was fussy cut then affixed to the card with foam tape. I added the Wicked sentiment and added a few sequins from Sparkle Blends.


Have a Wicked day my friends!!
Roni

Supplies:

Lost Coast Designs - Batty
Imagine - VersaMark, Mboss Gold Embossing Powder, Sponge Dauber, VersaFine Clair Nocturne
Sparkle Blends Sequins Mix
Pattern Paper, Cardstock, Foam Tape

Monday, July 27, 2020

Pixie Christmas

Welcome back to Lost Coast Portal to Creativity where Lost Coast Designs and Carmen's Veranda collide to bring you twice the inspiration and double the fun!

There's still time to join us for our Christmas in July Challenge and today I have a bit of Pixie Christmas for you...


Step 1 - Stamp the sentiment repeatedly over a red cardstock panel using Acorn VersaFine Clair ink.

Step 2 - Stamp the Daisy Flourish in the corners using Nocturne VersaFine Clair ink.

Step 3 - Cut a 2.25 x 3.25" red card panel. 

Step 4 - Stamp Candy Cane background on the panel with VersaMark ink.

Step 5 - Sprinkle white embossing powder over the stamped candy canes, shake off excess powder, heat to melt the powder.

Step 6 - Mat the candy cane panel with dark chocolate cardstock.

Step 7 - Stamp the pixie onto a piece of white cardstock and color as desired. Fussy cut the image.

Step 8 - Apply glue and a fine glitter to the pixie wings.

Step 9 - Stamp sentiment on white cardstock, trim and mat with red cardstock.

Step 10 - Mount the red background panel on a dark chocolate card base; affix the candy cane panel and then add the pixie.  Glue the sentiment so it looks like the pixie is holding the sentiment.


Be sure to join us before it's too late!


Supplies:


Imagine - VersaFine Clair - Nocturne, Acorn; VersaMark, White Embossing Powder

Glitter, Cardstock, Heat Tool

Monday, June 22, 2020

Background Forward

Welcome back to Lost Coast Portal to Creativity where Lost Coast Designs and Carmen's Veranda collide to bring you twice the inspiration and double the fun!

Hello all Cathy here with a card for you.

Stamps Used:
Argyle Background
Again I was watching a video. This one was by Jennifer McGuire and her faux monoprint. So I thought I would give it a try.
Here are some of my backgrounds I did.

What you have to is ink the paper with dye ink. I used Distress inks. You have to add a lot of ink to make this work. The orange and yellow one I just took the pad and swiped it across the paper. I did the same for the one I used. The circle one I tried with a blending tool. 
Next you have to dry it completely because you are going to heat emboss with clear embossing power for the next step. If the ink is not dry the embossing power will stick to it and we don't want that. After you heat emboss your image, background on the inked cardstock take another white sheet of cardstock and tape it to the top(or bottom) of the embossed piece.
Have you die cutting machine out because that is what you are going to use to make the second piece with the white 'emboss' area.
Cover the white cardstock so it doesn't get sprayed with water. I used a paper bag. Spray the embossed piece with water. A lot of water. I sprayed it at least 5 to 6 times. Then fold the white cardstock over (because you taped it to the other it is like a hinge)  run it through your die cutting machine. I did mine about 4 times back and forth. you then take it out and you have the white 'emboss' resist on the other piece. If you missed a spot you can just spray it again and run it through. Set aside to dry and now you have 2 backgrounds for the price of 1.
I then just added it to a white card base and added a die cut flower to the front.
Come join the fun challenge here
Also the sale is still going on. 25% off . Go get some stamps.