Showing posts with label Christmas. Show all posts

Friday, July 4, 2025

Happy Jingle and Magic

Welcome back to Lost Coast Portal to Creativity where Lost Coast Designs and Carmen's Veranda collide to bring you twice the inspiration and double the fun!
 
Hello Portal Peeps!  Hope your July 4th is wonderful.  Gail here today and I have some red, white and blue Christmas in July inspiration for your today.
I've made some artist trading coins with Carmen's Veranda Elf and Lost Coast Designs PMC Circle Frame background.  Words selected from the Misc. Words set.
Aren't they adorbs!!
Join the Christmas In July fun.  Link up your stamped anythings featuring Christmas!!
Thanks for dropping by.  Hugz
 

Saturday, December 28, 2024

#192 Cold and Frosty, winter scenery.

Welcome back to Lost Coast Portal to Creativity where Lost Coast Designs and Carmen's Veranda collide to bring you twice the inspiration and double the fun!

 
Hi, Riet here.
Well, another year has almost passed.
This is also my last time this year that I blog.
But I hope to see you again in the new year.

For today,
  My DT contribution for the "Cold and Frosty" challenge of  Lost Coast Designs.
Still time to join till the end of the month.

Now how to make this quick and easy card.
Supplies,
Die of a deer.
Distress ink, Iced Spruce.
Any black inkpad.
White gell pen.
White acrylic paint.
Black marker.

Start with a piece of torn printing paper.
Lay it over your paper and use a finger sponge.
Use Iced Spruce to make edges along the paper.
If you apply a little more pressure in a few places you can make tufts of grass.

Now we are going to use Distress ink Iced Spruce
 and the brayer to create the sky.
Go slowly, taking ink multiple times is better than too much at once.
Stop when you are satisfied with the result.

Now we are going to stamp the tree with black ink.
There are several ways to use your stamps.
In this case, the Grunge Tree stamp has a border.
I cut the tree out. This way you have 3 stamps.
You can use it completely, or just the tree, or just the border.
I stamped the tree twice.
Once straight as a tree and once diagonally against it as a thick branch.

Just look at the white circle.
We fill in the space to connect the branch with the tree with a black marker.
And that's how you make the tree as big as you want.

Using the white gell pen we make snow on the tree and branches.
And with the acrylic paint we splatter snowflakes.

Now I have to admit that I made a mistake.
I glued the die cut of the deer after splattering with the white paint.
 I should have done that earlier so that the deer also has snowflakes on its back and body.
But the choice is up to the maker what you like better.
I also extended the tree trunk with a black marker.

Glue your card onto black and white cardstock,
 and you have a beautiful yet easy to make winter scene.

I wish everyone a happy new years eve, and see you in 2025.

If you have a winter card, come and join the challenge.
Maybe you'll be our next winner.
No LCD stamps required to join.

Wednesday, December 25, 2024

MERRY CHRISTMAS

Welcome back to Lost Coast Portal to Creativity where Lost Coast Designs and Carmen's Veranda collide to bring you twice the inspiration and double the fun!
 
We would like to wish all our customers and blog friends a very 
 

MERRY CHRISTMAS


Thank you so much for your support this year for our small family business and for sharing your beautiful projects using Lost Coast Designs and Carmen's Veranda stamps. 
I'd also like to thank the design team for the amazing work they do all year.
We hope you have a day full of love and joy.
 Treasure the little things.
 
If you are crafting don't forget our 

COLD AND FROSTY CHALLENGE

 is running until the end of the month.  The team are sharing awesome inspiration all month here on the blog so take some time to enjoy their projects and maybe leave a little love.
The world need more love.

Friday, December 6, 2024

Cold And Frosty Cookie Basket

Welcome back to Lost Coast Portal to Creativity where Lost Coast Designs and Carmen's Veranda collide to bring you twice the inspiration and double the fun!
 
Hello Portal Peeps!!  Gail here today with a little project to hold some cookies.   I did some baking and thought it would be nice to give some away in a cute little basket.  I've used blues and snowflakes and glitter for that Cold and Frosty look.

I used Carmen's Veranda Reindeer Doll with Lost Coast Designs Small Snowflakes and ATC Doodle Circles stamps.  I altered the measurements from a tag holder project I made the other day, increasing the basket size to accommodate my cookie package.

I started by stamping Reindeer Doll twice on white card, because I need an image for both sides of the basket.  I masked and stamped ATC Doodle Circles with pale blue ink all over the card.  I need some extra pieces of background for the sides and handle.

I stamped the Small Snowflakes with dark blue ink and coloured the deer with shades of blue distress markers and Promarkers.  I gave the dress a watercolour wash.  I cut the stamped panels with a tag die and backed with the blue card I used to make the basket.  Then I added some glitter, cos you need a bit of sparkle at Christmas.

Here's a view of the finished basket with my pig shaped cookies on the side.

We hope you get some time to stamp and join us at the Cold and Frosty challenge.  Don't forget to pop back and check out all the awesome inspiration from the team.  

Thanks for dropping by.  Hugz

Sunday, November 10, 2024

Gnome-vember challenge, Love the gnome santa.

Welcome back to Lost Coast Portal to Creativity where Lost Coast Designs and Carmen's Veranda collide to bring you twice the inspiration and double the fun!

 Hello crafters, Riet here with a gnome christmas card.
Love this gnome challenge.
Always so nice those little funny creatures.
For this card I used The Santa with toys (large)
And the merry Christmas from the Party words sheet.

It is an easy card.
Nice for the beginning card makers.
I took a smooth white double card.
Stamped the santa gnome with black waterproof ink.
Colored it with pencils.
With a stencil and gray ink sponged the stars on the white surface.
Die cut the presents, and glue them on the card.
Stamp the text in black.
Add some glitter to the gray stars.
And that's it, a quick Christmas card with a nice effect.

The design team would love it if you would join the challenge.
There are stamps of your choice to win.
So come to the blog and join in, the challenge runs until the end of the month.


Tuesday, July 30, 2024

Christmas Mona

Welcome back to Lost Coast Portal to Creativity where Lost Coast Designs and Carmen's Veranda collide to bring you twice the inspiration and double the fun!
 
Hello Portal Peeps!!  Gail here with a final inspiration for the Christmas In July challenge.  
I used Lost Coast Designs Flagstone Background stamped in red for the background.  I stamped Santa Mona, cut the lower part of the image into a square and fussy cut her hat so it protruded above the frame.   The panel behind was stamped with part of Lost Cost Designs Grunge Border 2" and I used the Merry Christmas from the Party Words set.  
You have until the end of the month to join the Christmas in July fun so get stamping.  
Check the rules to make sure your makes are eligible for the prize draw.
Thanks for dropping by.

Sunday, July 28, 2024

#187 Christmas in July challenge.

Welcome back to Lost Coast Portal to Creativity where Lost Coast Designs and Carmen's Veranda collide to bring you twice the inspiration and double the fun!
 
Hi there cardmakers and stampers.
Riet here with a new tutorial for you.
Today is my last card for the Christmas in July challenge.
I'll tell you how I made it.

Materials:
LCD mouse stamp,
(Not yet in the webshop)

Stencil Craftemotions 
xmas florals.
Blue/green bister.
Distressink,
Broken china,
Speckled egg,
Evergreen bough,
Twisted citron,
Barn door, for santa's hat.
White gellpen
Black fineliner
Stazon dove grey and Jet Black
Red glitter
Black inkpad.
Light grey marker.
Color pencils for the mouse.
Glue pen.

Lets start making the background.

I started with the 3 Distressinks
Broken china, Speckled egg and Evergreen bough,
I distributed the colors over the paper with sponges.

I sprayed it with plenty of water and blotted it with paper towel.
It lightened it up a bit.

Made it wet again and sprinkled some bister here and there.
Blot it again with the paper towel.

Now it looks like the photo, 
but when I turned the paper over I saw that the ink and bister had leaked through.
And it was beautiful too.

So I decided to make the back the front of the card.
But that is of course up to you to decide which side you like better.

Stamp the mouse with Stazon dove gray in the background and on a thin paper.
Also do this with the Santa hat.
Color the mouse and Santa hat on the loose paper.

Stamp the words around the mouse with black Stazon.
The Misk Words sheet contains a lot of words related to Christmas. 
So I stamped some of them on the card.

We now apply the holly leaves to the card with the stencil
 and the distress ink Evergreen bough and twisted citron and an ink blender.

Use the fineliner to scribble some lines around the words.
Color the mouse and Santa hat and glue them to the card.
Use the gray marker to create some shadows under the words and around the mouse.

I punch some holes of different sizes in a piece of mica sheet, 
I use this for the red berries.

I spunge it to the paper with distressink barn door.
Then I went over it with the glue pen and sprinkle it with the red glitter.

And that's it for this month's challenge.
There is still time to participate until the last day of July.
The winner will be announced on August 5.
Hope you'll join us and I wish you the goodluck.

Monday, December 25, 2023

MERRY CHRISTMAS

Welcome back to Lost Coast Portal to Creativity where Lost Coast Designs and Carmen's Veranda collide to bring you twice the inspiration and double the fun!
 
We would like to wish all our customers and blog friends a very 

MERRY CHRISTMAS


Thank you so much for your support this year for our small family business and for sharing your beautiful projects using Lost Coast Designs and Carmen's Veranda stamp. 
I'd also like to thank the design team for the amazing work they do all year.
We hope you have a day full of love and joy.
 Treasure the little things.
 
If you are crafting don't forget our 

IN THE DEEP MIDWINTER CHALLENGE

 is running until the end of the month and the team are sharing awesome inspiration here on the blog.  Take some time to enjoy a look at their projects and maybe leave a little love.
The world need more love.
 

Friday, December 8, 2023

#180 In the deep mid winter.

Welcome back to Lost Coast Portal to Creativity where Lost Coast Designs and Carmen's Veranda collide to bring you twice the inspiration and double the fun!

 
Hi, Riet here.
It's December so that's why it's a winter challenge.
Everything related to it is good for the challenge.
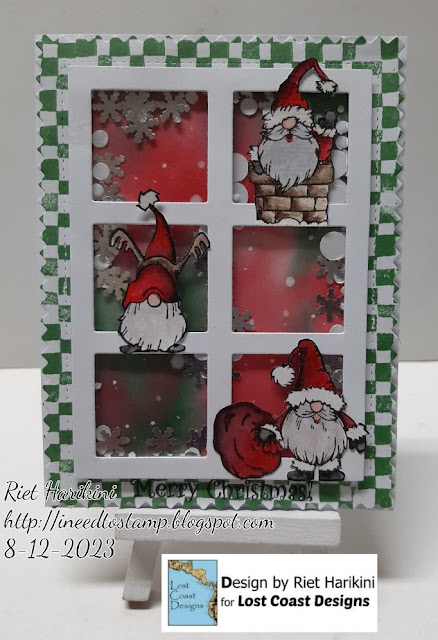
I chose these funny Christmas gnomes, really love them.
They come in two sizes.
For this shaker card I used the smaller ones.
And this is how I made the card:

What I used:
LCD stamps

Distressink:
Barn door
Memento tuxedo black

Small snowflake punch
Punch for white small cirkels that looks like snow 
White acrylic paint
White posca marker
Markers or pencils to color the gnomes.
Foam tape
Mica sheet
Window and frame die.

I started by coloring and cutting out the gnomes.

With the Distressink Barn door and Rustic wilderness I made 6 prints on my worksheet.

Spray some water on it and place your paper on top.
Don't wipe, just give it some time to absorb the ink.


Once the paper is completely dry, we will splash with white acrylic paint.

While the background is drying we continue with the frame.
We stamp the frame with Distress ink Rustic wilderness and the checkerd border stamp.

On the bottom of the frame we stamp the text "Merry Christmas" with Memento black.

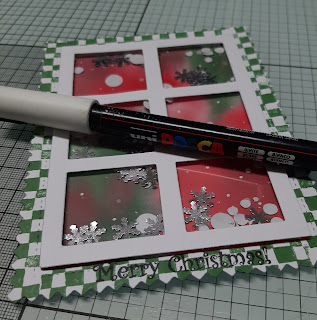
I cut some silver snowflakes with the punch.
And some dots in 3 sizes from white paper.
That is the filling for the shaker element.

I glue the red/green background onto a piece of paper.
Glue the checker board frame around it.
Now stick the foam tape on the back
and stick it on a white card.

Now glue the mica sheet that you first cut to size on the inside of the window frame.
Place foam tape around the frame.
Now place the shaker elements on the background and stick the window frame on the background.

Use the posca pen to put some white dots on the text.

Now we glue the gnomes to the windows.

The card is ready.
I hope you like it.
I'd love to see what you make of it.
So post it on the challenge blog or on the Facebook group.
Then you have a chance to win new stamps.