Sunday, February 28, 2021

Winged things: Calligraphy Doll

Welcome back to Lost Coast Portal to Creativity where Lost Coast Designs and Carmen's Veranda collide to bring you twice the inspiration and double the fun!

Hi everyone, Liesbeth here on the final challenge day for Winged Things! I made this very easy big card using only one stamp: Calligraphy Doll. The background is just a piece of design paper. I stamed the calligraphy doll stamp on it, and also onto another piece of (lighter) design paper and cut out the doll. I made a shadow around the doll on the bachground using charcoal pencil, and glued the cut out doll onto it. I finished with color pencil here and there.


Soon the new challenge will start, hope to see you! 
Liesbeth XX


Friday, February 26, 2021

Winged Things: Flying Mona

Welcome back to Lost Coast Portal to Creativity where Lost Coast Designs and Carmen's Veranda collide to bring you twice the inspiration and double the fun!

Hi to all from Laurie as we near the end of February - already - and the end of the "Winged Things" Challenge.  You still have a couple of days left in the month to get your projects posted on the Portal and a chance to win some free stamps.

I made a postcard for this one, using the Mona Flying stamp from Lost Coast Designs and the Forget Shit
clear stamp from Carmen's Veranda.  My postcard measures approximately 4 x 6 inches.

I started by covering a piece of card stock cut to 4 x 6" with a piece of a vintage letter with beautiful calligraphy type handwriting.  Next I tore a part of a flowered page from a vintage nature book,  inked the edges with Vintage Photo Distress Ink, and affixed it to the left side of my card.  I inked around the other edges as well.

I stamped Mona with black ink onto white card stock and colored her with yellow and orange Copic Sketch Markers.  I fussy cut her out - the stamp comes with wings but I cut those off with the idea of adding some larger butterfly wings.  I found a beautiful yellow and orange butterfly, cut it out, and positioned it behind Mona.  I found a few extra orange flowers that I fussy cut out and attached to the lower right corner.  I attached Mona as shown and added some fancy flower buttons to the front of her dress.  I added a vintage postage stamp to the upper right corner and edged the whole card with black decorative sticker trim.

My sentiment was stamped with black ink onto a white square edged with black.  I had to reduce the size on my copier as the original stamped image was a bit large to fit as I wanted it.  I affixed my sentiment with foam tape to the upper left corner, and she's done!

Please join us for this "Winged Challenge".  You just might have some free stamps "winging" your way!


Wednesday, February 24, 2021

# 116 Winged things.

Welcome back to Lost Coast Portal to Creativity where Lost Coast Designs and Carmen's Veranda collide to bring you twice the inspiration and double the fun!

Hallo everybody, Riet here.
How are you all doing. 
Hope you are crafting so you can join our challenge.
For this challenge "Things with wings", I made this dragonfly.
And this is how I made it.


This is what I used:

Large florish  
Dragonfly from the More bugs set.
I am a child of the moon

Glimmermist
Key lime pie
Haunted shadows
Caribbian blue
Distress Micro glaze
Stazon black
white gellpen
Distress seedless preserves
Markers or pencils (what your preference is)

How its made.
I really love the glaze resist and use it a lot.
Just love the effect with ink on water base.
And its so easy to use and with great results.
So start with the glaze on your florish stamp.
I stamped it random on the paper.
Then I sprayed the glimmer mist.

It looks so jummie, and the colors blend so well together.
And I love the shimmer of the glimmermist.
Let it dry, I did not use the heattool this time.
The paper was very wet, and I did not want to lose the drops effect.

And how pretty is this and so easy.
Now we stamp the dragonfly on a thin peace of paper.
And color it as you like.
You can take the same colors as the background, 
but it is also pretty when you use different colors.
That way the dragonfly pops more.
I often use a gelpen on my art.
Just love the effect, as specially on the wings of dragonfly's or butterfly's.
It gives it just that little bit special look.
I went along with stamping the Carmen Veranda's child of the moon frase.
Cut it in 4 pieces and hit the edges with the seedles precerves ink.
So you see that you can use a stamp in many different ways.
Now glue everything on and your done.

The team and I would love to see what you can make with wings.
Show us please, join the challenge, and than you can win some rubberstamps.
The challenge runs till the end of the month.
Read the rules first and join us with this lovely challenge.


Monday, February 22, 2021

Starry Starry Night

Welcome back to Lost Coast Portal to Creativity where Lost Coast Designs and Carmen's Veranda collide to bring you twice the inspiration and double the fun!

 Good morning and a very happy Monday. It's Sue here with my second piece for our Things With Wings challenge, and I've made a journal page.
I knew that I wanted to use Steampunk Icarus as my main image and in a Starry Night homage.

I started by stamping and embossing the circles from Leonardo Accessories in yellow, but they turned out to be a sort of burnt orange. The Cracked Grass and Sky was embossed in white. My journal is textured watercolour so it can take loads of water, which is my next stage.

Then dipped and dried (many many times) in the blue distress inks. They resisted the ink beautifully, but I wasn't a fan of the colour of the circles so I stamped them again, cut them out and added them to my background.

I added some yellow Portfolio pastels, and
was much happier with this, so now on to the main images! 
I collaged some book pages and gave it a coat of gesso then I stamped my row of houses onto it using the stamping platform.
And it was an epic fail! The texture was too uneven for all of the stamp to hit it. That made perfect sense after I'd spent an hour of my life that I would never get back doing it!
So, on to plan B! Stamped onto my super smooth card and coloured with Distress Inks. Then my favourite - fussy cutting - shoot me now. I've heard that some people actually enjoy this ?????? But, they do look nice when they're done, don't they!
This is my leading man - Steampunk Icarus who today has flown too close to the moon! The moon is actually the centre part of the Goth Shrine.
I typed up the sentiment on my computer and added to the page.
These are the stamps that I've used. They are all by Lost Coast, and can be found here.
Goth Shrine (moon)
Cracked Grass and Sky (this would come to you in one piece, I'm terrible for cutting up my stamps - sorry not sorry!
And there we are, all done! It's not quite as it was in my head, but then again I'm no Leonardo! Don't forget to join in with our challenge, just feature something with wings! Have a great day, and thanks so much for looking x


Saturday, February 20, 2021

Winged things:

Welcome back to Lost Coast Portal to Creativity where Lost Coast Designs and Carmen's Veranda collide to bring you twice the inspiration and double the fun!


Hello everyone, Liesbeth here again. Today I show you a ,winged thing', for the Challenge, an oldie I made a while ago. The background of this ATC's is lots of stamping, sponging, masking and bleaching... The winged creature is from the Mini Flying Ladies set, I gave here a new head, cut out of a real postal stamp.

Hope you will participate and join our challenge fun!


Liesbeth XX


Thursday, February 18, 2021

Use your wings

Welcome back to Lost Coast Portal to Creativity where Lost Coast Designs and Carmen's Veranda collide to bring you twice the inspiration and double the fun!

Hello Cathy here with a card and a tag for you today.
Stamps Used:
I started out with the new distress color pink and some mixed media paper. I did the smooching technique with the inks I used the dye and oxide inks in the new pink color. Then I wanted to see what it would look like with green. So I took a green distress spray and did the same technique for it. I really like the look. 
Next stamped  pieces of calligraphy  with drown distress in randomly over the back. I then edged the sides with that same brown. Set aside to work on the tag.

For the tag I just used a shipping tag that I had in my stash, I did the same smooching technique on the tag but just with the pink ink. I used the dye and oxide for this too in the same new color. Stamp  pieces of calligraphy  with the brown in here also. Next take the large butterfly from the Butterfly set in black ink off the side of the tag. Tare the tag at the bottom and ink around it with the same brown ink. 
Lastly decide where you are going to add the tag and then stamp 1 of the small butterfly in black and the new pink on the card base that you set. 

Glue the tag on the front and add some ribbon and some saying and you have the card.
I hope you come and join the fun challenge here

Tuesday, February 16, 2021

Owl Come For The Cake

Welcome back to Lost Coast Portal to Creativity where Lost Coast Designs and Carmen's Veranda collide to bring you twice the inspiration and double the fun!
 
Hello Portal Peeps.  Gail here today with a pile of owls for the Winged Things Challenge.  We want to see winged things as the focus of your stamped project.  Don't forget February is a short month so grab your birds, planes, angels, dragons, or any other winged thing that takes your fancy and join the fun.
 
I used Lost Coast Designs Owls Set and Party Words.
I started by stamping the owls on scraps of patterned paper.  The large owl on a blue scrap, the medium owl on a pale beige scrap and the small owl on a pink dotty scrap.  Stamped him twice cos the first one ended up with a orange dot on his face!!
There is a lot of detail on these owls, so after fussy cutting and adding some colour with Promarkers I decided the small owl was too dark.  I restamped him on the pale beige I used for the medium one and found a scrap of cream with pink dots for the medium one.  This was also my original idea for the way I would add them to the card but that changed too.
 
I used four of the Party Words sentiments and made a word block.  I stamped it on my DL card made from Authentique patterned paper using Bluebird archival ink.  Then I edged the card with carnation archival.

I die cut a branch and added a little Promarker colour and then arranged it and the owls on the stamped card base.  

The Winged Things Challenge is open until the end of the month so grab your stamps and join the fun for a chance to win Lost Coast Design dollars!!!

Due to the mass cancellation of stamp/scrapbook shows Linda is running an online virtual convention.   Use coupon code QUARANTINE to get 25% off any purchase of Lost Coast Designs or Carmen's Veranda stamps.  Katzelkraft stamps, stamp accessories and Stencil Girl stencils are not included in the sale.


Monday, February 15, 2021

CHALLENGE #116 - WINGED THINGS

Welcome back to Lost Coast Portal to Creativity where Lost Coast Designs and Carmen's Veranda collide to bring you twice the inspiration and double the fun!
 
Hello Portal Peeps.  It's time for our new Challenge.
Our challenges are now fortnightly!  A new challenge starting the 1st and the 15th of every month, with chances to win your self some Lost Coast dollars. We will be announcing winners on the 5th of the month, so do pop back and see who wowed the team and gets our snazzy blog badge and the coveted Lost Coast dollars.

Now for our new Challenge!

CHALLENGE #116

WINGED THINGS


We want to see things with wings as the focus of your stamped anything. 
Real rubber or clear stamping and the theme must be the focus of your project.  A small stamped sentiment in a sea of die cuts or digi images will not qualify to win the prize and you may be deleted!!!!  Bwahahhaaahaha.

Please remember we do have some Challenge Rules to follow so look them over to ensure your entries qualify to win this month's prize!

You are welcome to play in our Challenges using rubber stamp images from any company but if you use any of our Lost Coast Designs or Carmen's Veranda stamps...we love it when you do...then your entry counts as two which doubles your chances of winning in our random prize drawing.

PRIZES

To ensure you all have a fabulous time playing in our Challenges this is how our Prize system works!
The more entries the better the Prize so tell all your friends to join the fun too!

1 - 4 Entries = one winner chosen by the team is awarded our Challenge Winner's Badge
5+ Entries = one randomly picked winner will receive a $5 gift certificate to spend at
Lost Coast Designs/Carmen's Veranda
10+ Entries = one randomly picked winner will receive a $10 gift certificate to spend at
Lost Coast Designs/Carmen's Veranda
and all winners get our snazzy Challenge Winner's Badge to proudly display on their blogs!

If you don't have a blog then no problem, you can still play in our challenges by sharing your projects from public photo sharing sites which includes our Facebook Company Pages for Lost Coast Designs and Carmen's Veranda, or our official fan group.  Please include our Challenge info and the link back to our challenge in your photo's description!  As long as the privacy setting for your photo is public you're good to go.  See, it's so easy to join the fun!  FYI, you can't link up projects shared in closed Facebook groups! 

Here's some inspiration from the team to get us started.  ENJOY! 
 
Laurie  made this beautiful card using Lost Coast Designs Calligraphy Doll
  
 
Riet made this awesome wallhanger using Lost Coast Designs Winged Girl
 
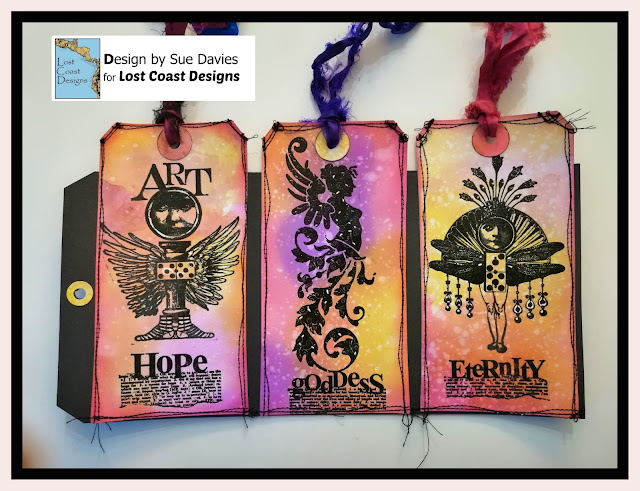
Sue made these gorgeous tags using Lost Coast Designs Silhouette Angel, Art Doll, Lynnea, and Mystery, Eternity, Hope, Goddess Dictionary Words


Now it's your turn.  Are you up for the challenge?  We can't wait to see your projects!  
Submit your entries in the linky party below by 23.59 PST on the 28th and don't forget to follow us so you don't miss anything!  The team will be posting more inspiration throughout the month so check back and join the fun.

Happy Stamping!
Gail
Challenge Host

Challenge #116 - Winged Things
February 15th - 28th Please read over out RULES to be sure your entries qualify you to win!
ALL rubber stamp companies are welcome.
Linky closes Sunday, February 28th 23.59 PST.
All entries must be entered in our link up but your don't need a blog to win.  See our RULES page for more info


Sunday, February 14, 2021

Red and gold: Love

Welcome back to Lost Coast Portal to Creativity where Lost Coast Designs and Carmen's Veranda collide to bring you twice the inspiration and double the fun!


Hello everyone, today it's Valentine's Day, so today I show you a love themed card in red and gold for our challenge.💓
I stamped the calligraphy heart stamp 4 times onto a big square card using light and darker red ink. I stamped the loveheart stamp on a smaller piece with the dark red ink. I sponged both here and there with the light red ink. I glued both pieces onto gold cardstock en sticked the small one onto the vig one. I finishe with a golden gel pen and gold glitter glue. Hope I inspired you. See you next time!


Liesbeth XX


Friday, February 12, 2021

Always and Forever

Welcome back to Lost Coast Portal to Creativity where Lost Coast Designs and Carmen's Veranda collide to bring you twice the inspiration and double the fun!
Cathy here with a card for you
Stamped used: 

I started off by stamping Wings and embossing in gold. Cut out. Next take some black and white pattern paper I picked a Valentines theme and cut out a panel for the front of the card. Then layer it onto a red mirror cardstock. Add some foam to the wings and then add them to the front in the center. Add a saying. Mine I picked one that you could use for Valentines. Place that on a black card base. Lastly add a gold strip on the bottom to tie it all together.  

I hope you join the challenge here

Wednesday, February 10, 2021

#115 Red and Gold challenge for Lost Coast Designs

Welcome back to Lost Coast Portal to Creativity where Lost Coast Designs and Carmen's Veranda collide to bring you twice the inspiration and double the fun! 


 Red gold, Pope clown

Hi there, here is my card for the red and gold challenge.
These are the stamps I used.Pope clown
I used only the last sentence of this stamp.

Carmens veranda has a lot of words and phrases clear stamps.
They are spectacular and some are even a bit cheeky, love them all.
So if you have the time, take a look, I am sure you have a good laugh.

 What I used for this card.
Brusho brilliant red.
Gold glitter embossingpowder.
Black Stazon
Red marker.
Gold ink.
Versamark clear.
 I started with the florish by stamping it with versamark clear.
Embost it with the gold glitter embossingpowder.
Them I sprayd with water and brusho brilliant red.
Be careful, this color is really intense.
Dry it with the heattool.
With a smal brush I painted some of the brusho in the open parts of the florish.
Now cut it in four pieces.
Save a little piece and stamp the sentiment the same as the florish.
Only stamp "happily ever after".
Stamp the Pope clown with the stazon black.
Color him with the red marker.
I have used gold ink, but you can also use a gold balpoint or something else.
Glue the parts on a white card and matt with black.
Have fun with stamping and please show us what you make in red and gold.

Join our challenge and maybe you will be the next winner.


Monday, February 8, 2021

Red and Gold: Flourish Bookmark

Welcome back to Lost Coast Portal to Creativity where Lost Coast Designs and Carmen's Veranda collide to bring you twice the inspiration and double the fun!

Hello Crafters and welcome from Laurie to this current challenge on the Portal:  Red and Gold.  Such sumptuous colors that work with so many themes.

For this one, I made a bookmark using the Daisy Flourish stamp from Lost Coast Designs.
This was very simple, but I love the elegant feel of the gold embossing.

 I stamped my flourish with Versamark embossing ink onto a piece of black card stock.  I sprinkled it with gold embossing powder then heat embossed it.  I then restamped the daisy parts of the stamp onto a scrap of black and heat embossed it with red embossing powder.  I cut out the red flowers and glued them atop the gold ones.  

Next I trimmed up my edges evenly and corner rounded all four corners.  I layered this with a piece of gold paper and rounded those corners as well.  Final step was to punch a hole at the top in the middle and thread some gold cord through the hole.  A simple bookmark using an absolutely gorgeous stamp from Lost Coast.

Show us your Red and Gold creations for a chance to win some free stamps from Lost Coast Designs or Carmen's Veranda.   Be sure that rubber stamping is a focal point of your projects.


Saturday, February 6, 2021

Red And Gold Shaker Frame

Welcome back to Lost Coast Portal to Creativity where Lost Coast Designs and Carmen's Veranda collide to bring you twice the inspiration and double the fun!

Good morning and a very happy Saturday, It's Sue here with my shaker frame for our Red and Gold challenge.


I started by painting my frame in bright gold paint. It took a few layers to get it nice and shiny.
Then I made my background using different shades of red Oxides.
I used my new Ledger stamp to stamp the frame and stand in red and black, and heat embossed.

And then stamped the beautiful Carmen's Veranda Birds Collage Background in black. I then stamped it again and embossed in gold and cut out and pieced the bird. You can't really tell here, but in real life you can see the gold.
I stamped and cut out the words from the Misc words stamp and added acetate and red and gold sequins to turn my frame into a shaker.

These are the stamps that I've used, 
Lost Coast Ledger
Lost Coast Misc Words and
Carmen's Veranda Bird Collage Background

I hope that you join in with us, red and gold is such a gorgeous combo, so please link up for the chance to win some Lost Coast dollars.
Take care, have a very happy day, and thanks so much for looking x